
Side Dishes
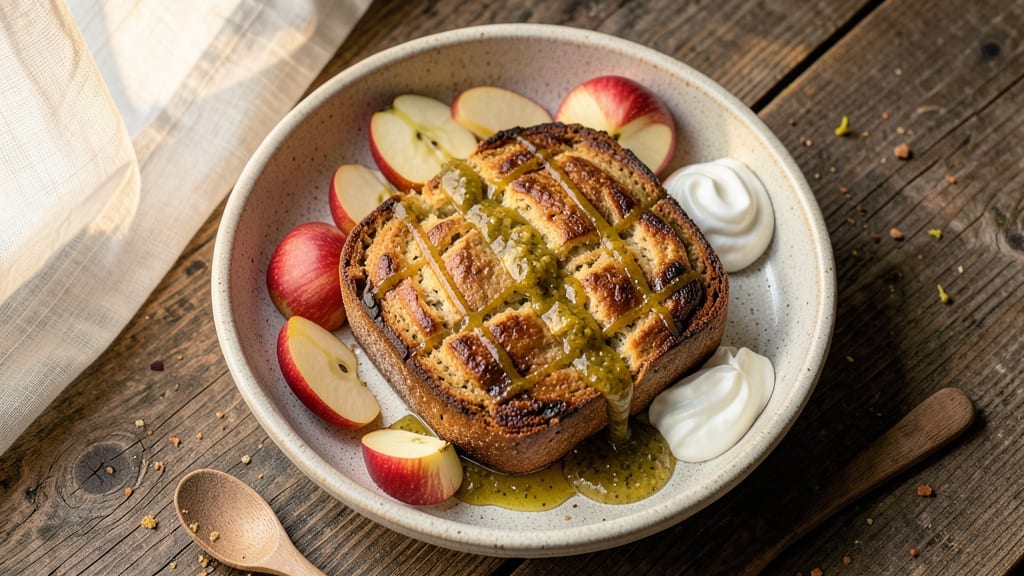
This anti-candida bread recipe delivers a gut-friendly loaf that skips yeast and gluten while packing candida-fighting ingredients like coconut flour, apple cider vinegar, and garlic. The result? A tender, slightly sweet bread with no bloating or yeast-related discomfort—just pure, nourishing comfort. I developed this after years of experimenting with gut-healing baked goods, and it’s become a staple in my kitchen for both dietary needs and deliciousness.
The secret lies in the combination of almond flour and coconut flour for structure, while apple cider vinegar and garlic act as natural antifungals. Probiotic-rich ingredients like unsweetened coconut yogurt ensure your gut benefits with every bite.
Unlike traditional bread, this recipe avoids gluten and yeast, making it safe for sensitive systems while still delivering that satisfying rise and soft texture.
What you’ll end up with is a lightly sweetened, moist loaf that’s perfect for toast, sandwiches, or simply enjoying warm with a spread of almond butter.
The aroma alone—warm spices and a hint of garlic—makes this bread irresistible, and the texture is surprisingly close to traditional bread without any of the digestive drawbacks.
Best of all, this recipe is beginner-friendly, with no special equipment needed beyond a loaf pan. The ingredients are easy to find, and the steps are straightforward, ensuring you’ll have a nourishing loaf on your table in under an hour.
Whether you’re managing candida or simply looking for a healthier bread option, this recipe delivers both flavor and function.
Ingredients for anti candida bread
Twelve gut-healing ingredients transform into a nourishing loaf without yeast or gluten.
| Ingredient | Amount | Notes |
|---|---|---|
| Almond Flour 🌰 | 2 cups | Finely ground for optimal texture |
| Coconut Flour 🥥 | ½ cup | Essential for structure and binding |
| Unsweetened Coconut Yogurt 🥛 | 1 cup | Probiotic-rich for gut health |
| Apple Cider Vinegar 🍎 | 2 tbsp | Raw, unfiltered for antifungals |
| Garlic Cloves 🧄 | 4 cloves | Freshly minced for potency |
| Extra-Virgin Olive Oil 🫒 | ½ cup | Cold-pressed for nutritional integrity |
| Raw Honey 🍯 | ¼ cup | Substitute maple syrup for vegan option |
| Baking Powder 🧂 | 1 tsp | Aluminum-free for sensitive systems |
| Sea Salt 🧂 | ½ tsp | Fine grain for even distribution |
| Ground Cinnamon 🌿 | 1 tsp | Enhances flavor and blood sugar balance |
| Vanilla Extract 🌸 | 1 tsp | Pure, alcohol-free preferred |
| Chia Seeds 🌱 | 1 tbsp | Acts as natural egg substitute |
| Water 💧 | ½ cup | Filtered preferred for purity |
The almond flour and coconut flour combination creates the perfect structure for this bread. Bob's Red Mill almond flour is my go-to for its fine grind, while coconut flour must be Bob's Red Mill brand—it absorbs moisture differently than other brands. Unsweetened coconut yogurt is non-negotiable here; So Delicious brand works best as it's thick and probiotic-rich. For apple cider vinegar, Bragg's raw, unfiltered version delivers the strongest antifungal properties. Garlic should be fresh and never pre-minced—the potency drops dramatically once exposed to air. Extra-virgin olive oil matters here too; California Gold or Colavita brands provide the best flavor profile without bitterness.
No almond flour? Cashew flour or oat flour can substitute at a 1:1 ratio, though texture may vary slightly. Coconut flour is trickier—if unavailable, a mix of psyllium husk powder and oat flour can mimic its binding properties. For the honey, maple syrup or agave nectar work equally well in terms of sweetness and moisture content. The chia seeds can be replaced with flaxseeds at the same quantity, but they won't bind as effectively. If you're sensitive to vanilla, vanilla bean paste provides more flavor with less potential for contaminants. The baking powder should be aluminum-free—check the label as many brands contain it.
This dough must rest for at least 15 minutes after mixing to allow the coconut flour to fully absorb moisture. Store any leftovers in an airtight container at room temperature for up to 3 days, or freeze for 3 months by wrapping tightly in plastic wrap. For reheating, wrap slices in a damp paper towel and warm in the oven at 350°F for 5-7 minutes to restore freshness. The bread's texture improves after the first day as the coconut flour continues to hydrate fully—a common characteristic of coconut flour baked goods.
Why You'll Love This Recipe
- Here’s what sold me: I use the same base ingredients for muffins, pancakes, or even a quick flatbread. The coconut yogurt adds creaminess without costing a fortune, and the flours stretch further than regular bread dough. My wallet and my gut thank me.
- No-Fuss Mixing: I swear by this recipe—just blend, pour, bake. No kneading, no waiting for dough to rise, no stress. The almond and coconut flours come together like magic when you add that tangy apple cider vinegar to the yogurt batter.
- Garlic-Kissed Comfort: That raw garlic isn’t just for flavor—it’s the star. The cloves mellow into a warm, savory depth that pairs perfectly with the nutty richness of the flours, making every bite feel like a cozy hug for your taste buds.
- Meal Prep MVP: Between us, this bread is my secret weapon for busy mornings. Toast it for breakfast, pack slices for lunch, or freeze the leftovers—it stays fresh for days without drying out. Honestly, I make a double batch every Sunday just to stay ahead.
Step-by-step instructions for anti candida bread
This method delivers a perfectly risen, gut-friendly loaf without yeast or gluten.
Prepare the Chia Seed Egg Substitute
In a small bowl, combine the 1 tablespoon chia seeds with the 0.5 cup water. Stir vigorously and let it sit for 10 minutes until it thickens into a gelatinous consistency resembling an egg. This substitution provides the binding properties needed for a proper rise while avoiding traditional eggs.
I press the mixture through a fine-mesh sieve to eliminate any remaining clumps before incorporating it into the batter. This ensures a smooth texture throughout the bread. The chia gel also helps retain moisture during baking, which is crucial for a tender crumb in gluten-free baking.
Mix Wet Ingredients for Proper Hydration
In a large mixing bowl, combine the 1 cup unsweetened coconut yogurt, 0.5 cup extra-virgin olive oil, 0.25 cup raw honey, 2 tablespoons apple cider vinegar, 1 teaspoon vanilla extract, and the prepared chia gel. Whisk until completely smooth, scraping the sides of the bowl to incorporate all ingredients.
The apple cider vinegar is particularly important here—it not only adds tang but also helps balance the blood sugar impact of the honey. I mix these ingredients first to ensure the honey and oil emulsify properly, creating a stable base for the dry ingredients. The mixture should be thick but pourable, similar to heavy cream.
Incorporate Dry Ingredients Gently
In a separate bowl, sift together the 2 cups almond flour, 0.5 cup coconut flour, 1 teaspoon baking powder, 0.5 teaspoon sea salt, and 1 teaspoon ground cinnamon. Gradually add this dry mixture to the wet ingredients while mixing on low speed with an electric mixer or whisk by hand.
I use a folding motion to combine the ingredients rather than overmixing, which could develop gluten-like proteins in the almond flour. The coconut flour is particularly sensitive—add it last and mix just until combined to prevent a gummy texture. The batter should be thick and cohesive, holding its shape when dropped from a spoon.
Add Garlic and Final Adjustments
Finely mince the 4 cloves garlic and fold them into the batter along with the 1 teaspoon vanilla extract. The garlic should be distributed evenly throughout the mixture. At this stage, I taste the batter to ensure proper balance—it should be sweet from the honey but not overpowering, with a subtle tang from the vinegar and warmth from the cinnamon.
If the batter appears too thick, add 1 tablespoon water at a time until it reaches a consistency similar to thick pancake batter. This adjustment is critical for proper rise and texture. The garlic adds both flavor and antifungal properties that complement the anti-candida formulation.
Bake for Perfect Rise and Texture
Preheat your oven to 350°F and line a 9x5-inch loaf pan with parchment paper. Pour the batter into the prepared pan and smooth the top with a spatula. Bake for 45-50 minutes until the top is golden brown and a toothpick inserted into the center comes out clean.
I cover the pan loosely with aluminum foil after 25 minutes of baking to prevent over-browning while allowing the bread to rise properly. The internal temperature should reach 205°F for optimal texture. Remove from the oven and let cool in the pan for 10 minutes before transferring to a wire rack to cool completely.
Pro Tips For Making Anti Candida Bread
- Mix the Flours First: Mix almond and coconut flours together before adding wet ingredients—this prevents clumping and saves scrubbing later. I used to add yogurt straight to the coconut flour, and it turned into a gummy mess every time.
- Roast the Garlic: Lightly toast your garlic cloves (whole, skin-on) at 400°F for 15 minutes before mincing—it deepens their flavor without overpowering the bread’s subtle taste. Raw garlic can taste harsh in baked goods, and this step takes almost no extra time.
- Don’t Overmix the Dough: Stir just until combined—overworking the coconut flour releases gums that make the bread dense and rubbery. Two or three folds with a spatula is enough; I learned this after making a brick that weighed more than it should’ve.
- Use Room-Temp Yogurt: Cold coconut yogurt creates pockets of steam that can make your bread gummy. Let it sit at room temperature for 10 minutes before mixing—it blends smoother and bakes more evenly. Trust me, your future toast will thank you.
Troubleshooting your anti candida bread
Dense Texture Fix
If your bread turns out too dense, the issue is likely under-hydrated coconut flour. Coconut flour absorbs 4x its weight in liquid, so if your batter feels dry, whisk in 1 additional tablespoon of water at a time until it reaches a thick pancake consistency.
I’ve found that Bob’s Red Mill coconut flour behaves differently than other brands—always use this specific brand for reliable results. 🌱
Flat or Sunken Top
A flat or sunken top usually means the baking powder wasn’t activated properly. Double-check that your aluminum-free baking powder is fresh—old baking powder loses potency. Also, ensure your oven is fully preheated to 350°F before baking.
If you’re using a glass loaf pan, place it on the middle rack where heat circulates evenly. For extra rise, try adding ½ teaspoon cream of tartar to the dry ingredients next time.
Gummy or Sticky Crumb
Overmixing the batter or not letting the coconut flour hydrate properly causes a gummy texture. Mix the dry ingredients into the wet ones just until combined—no more than 20 strokes with a whisk.
Also, let the batter rest for at least 15 minutes before baking to allow the coconut flour to absorb moisture fully. If the crumb is still sticky after baking, try reducing the honey by 1 tablespoon next time.
Burnt Edges
Burnt edges happen when the oven runs hot or the bread bakes too long. Cover the loaf pan loosely with aluminum foil after 25 minutes of baking to prevent over-browning while still allowing the bread to rise.
For even baking, place a baking sheet on the rack below the loaf pan to reflect heat upward. If your oven runs hot, reduce the temperature to 325°F and bake for 55-60 minutes instead.
Crumbly Texture
A crumbly texture often results from too much almond flour or insufficient moisture. Ensure you’re using 2 cups of almond flour (not packed too tightly) and that the chia gel is fully formed before mixing.
If the bread still crumbles, try adding 1 extra tablespoon of olive oil to the wet ingredients. For extra binding, fold in 1 tablespoon of psyllium husk powder with the dry ingredients.
Nutrition facts
Frequently asked questions
Can I make this bread without coconut flour?
Yes, but the texture will differ. Replace the ½ cup coconut flour with a mix of ¼ cup oat flour and ¼ cup psyllium husk powder to maintain structure. The bread will be slightly denser but still delicious. For best results, add 1 extra tablespoon of water to compensate for the reduced moisture absorption.
How does this bread compare to traditional sourdough?
This anti-candida bread avoids yeast entirely, making it safer for gut health while still offering a satisfying rise. Unlike sourdough (which relies on fermentation), this version uses baking powder and chia gel for lift. The flavor is milder but includes natural antifungals like garlic and apple cider vinegar, which sourdough lacks. It's also gluten-free and lower in FODMAPs for sensitive systems.
Can I add seeds or nuts for extra crunch?
Fold in ¼ cup chopped walnuts or pumpkin seeds during the final mixing stage. For nut-free options, try hemp seeds or sunflower seeds. Toast them first at 350°F for 5 minutes to enhance flavor. Just be mindful of portion sizes—too many can make the bread dry.
Why does my bread taste bitter?
Bitterness usually comes from overbaking or using old spices. Ensure your bread reaches 205°F internal temp but no longer. Check your cinnamon and vanilla—old spices can develop off-flavors. Freshly minced garlic also matters; pre-minced garlic loses potency. If needed, add ½ teaspoon more honey to balance flavors.
How long can I store this bread?
Store at room temperature in an airtight container for 3-4 days, or freeze for 3 months. For reheating, wrap slices in a damp towel and warm at 350°F for 5 minutes. The coconut flour continues to hydrate over time, making the bread taste fresher with each day. Perfect for meal prep!