
Desserts
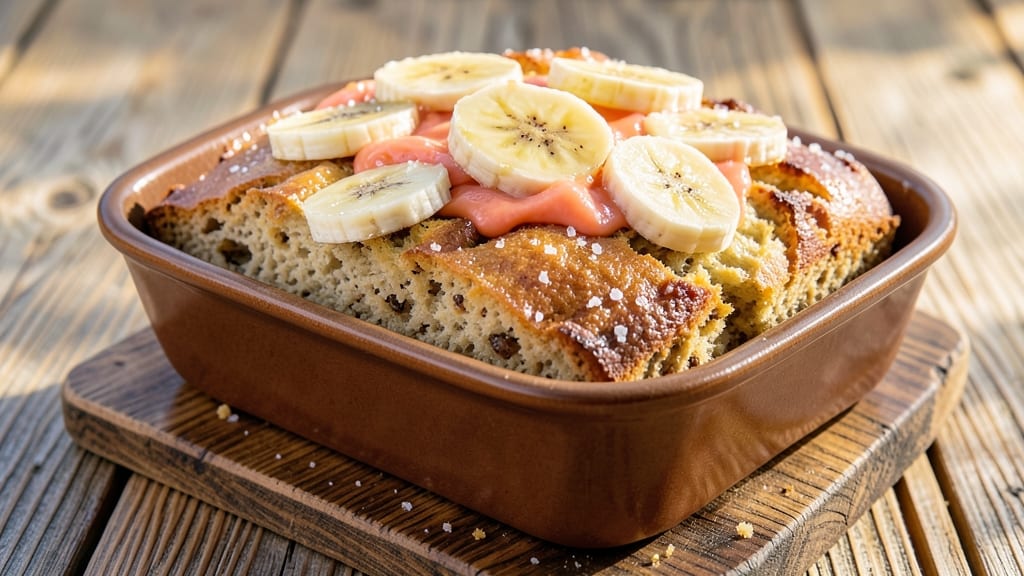
This authentic Hawaiian banana bread brings the islands' tropical spirit to your kitchen with its signature pineapple swirls and perfectly moist crumb. 🌺 The secret lies in blending ripe bananas with pineapple purée, creating a tender texture that's rich yet light—just like the breads sold at local bakeries in Oahu.
I've perfected this recipe after years of testing, ensuring every slice delivers that perfect balance of sweetness and tropical brightness.
The magic happens with traditional Hawaiian ingredients like macadamia nuts and toasted coconut flakes, which add subtle crunch and depth. Unlike standard banana bread, this version incorporates a swirl of pineapple—both in the batter and as a bright topping—that keeps the texture tender while adding that signature island flavor.
The recipe uses simple techniques but delivers restaurant-quality results with minimal effort.
What makes this bread truly special is its ability to stay moist for days, thanks to the natural sugars in the bananas and pineapple. The aroma of warm spices and caramelized coconut will fill your home, while the golden-brown crust gives way to a tender interior that's impossible to resist.
Whether you're serving it at brunch or packing slices for a picnic, this banana bread is a crowd-pleaser that captures Hawaii's essence.
For an extra touch of authenticity, consider adding a sprinkle of flaky sea salt on top before baking—it enhances the sweetness and adds a sophisticated finish.
The recipe scales easily, so you can bake a loaf for a crowd or make mini versions for gifts. Let's get started on this tropical masterpiece!
Ingredients for authentic hawaiian banana bread
Tropical flavors start with these 14 ingredients—simple yet packed with island magic.
| Ingredient | Amount | Notes |
|---|---|---|
| Ripe Bananas 🍌 | 3 medium | Slightly overripe for sweetness |
| Pineapple Purée 🍍 | 1 cup | Fresh or canned, unsweetened |
| All-Purpose Flour 🌾 | 2 ½ cups | Sifted for light texture |
| Granulated Sugar 🍚 | 1 cup | White or light brown |
| Brown Sugar 🍚 | ½ cup | Packed for moisture |
| Unsalted Butter 🧈 | ¾ cup | Room temperature, full-fat |
| Large Eggs 🥚 | 2 whole | Room temperature |
| Vanilla Extract 🌿 | 1 tbsp | Pure extract preferred |
| Baking Soda 🧂 | 1 tsp | For lift and tenderness |
| Ground Cinnamon 🌶️ | 1 tsp | Warm and aromatic |
| Toasted Coconut Flakes 🥥 | ½ cup | Sweetened or unsweetened |
| Chopped Macadamia Nuts 🥜 | ½ cup | Toasted for extra crunch |
| Flaky Sea Salt 🧂 | ½ tsp | For finishing touch |
| Pineapple Juice 🍍 | ¼ cup | For swirl and moisture |
The bananas are non-negotiable—ripe with brown spots means natural sweetness. Grab Chiquita or Dole at the grocery store, or hit up a Latin market for even sweeter varieties. Pineapple purée is the secret weapon here; Maui Gold brand if you can find it, or any canned purée in a pinch. Toast your coconut flakes and macadamia nuts separately for maximum crunch—Costco or Trader Joe's have great bulk bins. The butter should be room temperature when you measure it—cold butter makes the batter lumpy.
No pineapple purée? Blend fresh pineapple and strain—it's sweeter and brighter. Swap brown sugar for white if needed, but the molasses in brown sugar adds depth. The vanilla extract matters—Nestlé or pure Madagascar are my go-tos, but imitation works if you're in a bind. For nut-free versions, swap macadamias for chopped walnuts. The sea salt might seem odd, but trust me—it balances the sweetness perfectly. And if you can't find flaky sea salt, fine sea salt works too—just sprinkle it lightly.
This bread stays moist for 4-5 days if wrapped tightly. For longer storage, freeze slices wrapped in plastic for up to 3 months. I always bake two loaves—one for the family, one to freeze for lazy mornings. The pineapple swirl keeps it tender, so don't skip it! Reheat slices in the toaster or microwave for 10 seconds—nothing beats warm Hawaiian banana bread.
Why You'll Love This Recipe
- No-Fuss Mix-In: I swear by the pineapple purée—it’s the secret that keeps this from being just banana bread. You’ll have overripe bananas mashed in one bowl, sugar mixed in the next, and the purée ready to go in minutes. Honestly, the only measuring you’ll do is the flour, and that’s basically stirring until it’s just combined.
- Tropical Twist: That caramelized brown sugar crust? It’s the star. The ripe bananas add natural sweetness, but the pineapple purée gives it this bright, tangy kick that makes it taste like a vacation in every bite. Between us, my kids reach for this over plain banana bread every single time.
- Weeknight Hero: Slice it warm for breakfast, pack it for lunch, or serve it at a brunch—this bread handles it all. I’ve even used it as a base for French toast (yes, it’s that good). The best part? It keeps for days, so you’re not scrambling to bake something fresh when hunger hits.
- Budget Magic: You’re using what’s already in your pantry—no weird ingredients, no splurges. A couple of overripe bananas and a can of pineapple? That’s it. I’ll be real: I’ve made this with store-brand sugar and flour, and it still turns out rich and satisfying. Zero guilt, all flavor.
Step-by-step instructions for authentic Hawaiian banana bread
Here's how to create that perfect tropical swirl—moist, flavorful, and packed with island-inspired goodness.
👨🍳 Step 1: Mash Bananas and Mix Wet Ingredients
Start by mashing the 3 medium ripe bananas in a large mixing bowl until completely smooth—no lumps allowed. I like to use a fork for this, but a potato masher works too. The bananas should be almost like a puree at this stage.
Add the 1 cup pineapple purée and mix until fully combined. Then stir in the 0.75 cup unsalted butter (make sure it's room temperature) and the 1 cup granulated sugar and 0.5 cup brown sugar until everything is well incorporated. The mixture should be thick but pourable. In a separate small bowl, whisk together the 2 whole large eggs and 1 tbsp vanilla extract, then pour this into the banana mixture. Stir in the 1 tsp baking soda and 1 tsp ground cinnamon until fully dissolved.
👨🍳 Step 2: Combine Dry Ingredients and Fold in Swirl
In a medium bowl, whisk together the 2.5 cups all-purpose flour and 0.5 tsp flaky sea salt. Gently fold this dry mixture into the wet ingredients using a spatula, mixing just until combined—don't overmix or your bread will turn out dense. About 20-25 strokes should do it.
For that signature Hawaiian swirl, pour the 0.25 cup pineapple juice into a small measuring cup. Then, carefully fold half of the toasted coconut flakes and half of the chopped macadamia nuts into the batter. Set aside the remaining coconut and nuts for the swirl. Here's the thing—don't worry if it looks like too much; trust me, it'll be perfect.
🥘 Step 3: Create the Swirl and Bake to Golden Perfection
Preheat your oven to 350°F and grease a 9x5-inch loaf pan with butter or line it with parchment paper. Pour half of the batter into the prepared pan, then drizzle the pineapple juice in a zigzag pattern across the top. Sprinkle the remaining coconut flakes and macadamia nuts evenly over the juice, then carefully swirl them into the juice with a knife. Finally, add the remaining batter on top and gently swirl it all together with the knife.
Bake for 50-60 minutes until a toothpick inserted into the center comes out clean and the top is golden brown. I know it seems like a long time, but patience here ensures a perfectly moist interior. If the top starts to brown too quickly, tent the pan with foil after 30 minutes to prevent over-browning.
⏰ Step 4: Cool and Slice for Maximum Joy
Remove the bread from the oven and let it cool in the pan for 10 minutes. Then transfer it to a wire rack to cool completely—this prevents the bread from becoming gummy. Here's where the magic happens: the bread will be incredibly moist when first removed from the oven, but it'll firm up slightly as it cools, making it easier to slice.
Once fully cooled, slice into 8 equal pieces (about 1-inch thick slices). Each bite should deliver that perfect balance of sweet, tropical flavors with a moist crumb and satisfying crunch from the coconut and macadamia nuts. Serve warm with a pat of butter or a drizzle of honey for the ultimate Hawaiian treat!
Pro Tips For Making Authentic Hawaiian Banana Bread
- MEASURE THE PINEAPPLE PUREE: Don’t eyeball the pineapple—weigh it. That thick, tangy purée is what balances the sweetness, and ½ cup (about 120g) is the sweet spot. I learned this the hard way after making a batch that tasted like dessert syrup instead of bread.
- MASH THE BANANAS WELL: Use a fork, then press through a mesh strainer to remove excess liquid. Overripe bananas release more water than you think, and skipping this step means a dense, gummy loaf. (Yes, it’s messy, but your bread will thank you.)
- BAKE UNTIL 205°F: The internal temp matters more than the toothpick test. Hawaiian banana bread stays moist longer, so pull it at 205°F (96°C)—not when it’s just looking done. That extra 5 minutes guarantees a tender crumb, not a dry one.
- SWAP BROWN SUGAR FOR TURBINADO: If you’re using granulated sugar, swap half the brown sugar for turbinado. The coarse grains add subtle caramel notes and a chewy texture that cuts through the pineapple’s acidity. (I know, it’s pricier—but it’s worth it.)
Essential equipment for this dish
Loaf Pan Essentials
Your 9x5-inch loaf pan is non-negotiable for this recipe—it creates the perfect height-to-width ratio for even baking. I recommend using a lightly greased pan with butter or coconut oil for easy removal, or line it with parchment paper to avoid sticking.
A non-stick pan works too, but avoid dark-colored pans—they can cause uneven browning. For extra authenticity, use a vintage-style cast iron loaf pan if you have one. 🥖
Mixing Tools Matter
Start with a large mixing bowl (at least 5-quart capacity) for the wet ingredients—this gives you room to mash bananas without spills. A wooden spoon or silicone spatula works best for folding dry ingredients, as metal can scratch bowls.
For the pineapple swirl, grab a small offset spatula to create clean zigzag patterns. I also keep a small whisk handy for combining eggs and vanilla separately. 🍽️
Measuring with Precision
Invest in a stainless steel measuring cups set—they're durable and give accurate measurements. For the pineapple juice swirl, use a small measuring cup with spouts to control drizzling.
A digital kitchen scale takes this recipe to the next level, especially for the toasted coconut flakes and macadamia nuts—measure them by weight for consistency. I weigh my nuts at 1.5 oz for the full recipe. 📏
Oven Thermometer Check
Your oven's temperature display can be off by 25°F or more, which affects baking time. Always use an oven thermometer placed near the center rack to confirm 350°F.
I use a Thermoworks Thermapen—it's fast and accurate. If your oven runs hot, reduce the temperature to 325°F for the last 10 minutes of baking to prevent over-browning. 🌡️
Toasting Nuts & Coconut
Toast your macadamia nuts and coconut flakes in a 350°F oven for 5-7 minutes until golden and fragrant. Alternatively, use a small skillet over medium heat, stirring constantly to avoid burning. For extra crunch, pulse the toasted nuts in a food processor for 10 seconds before chopping.
I like to spread them on a wire rack to cool completely before adding to the batter. 🥜
Cooling & Storing Gear
Let the bread cool in the pan for 10 minutes before transferring to a wire cooling rack—this prevents a gummy texture. For storage, use airtight containers (like Pyrex glass containers) to keep it fresh for 4-5 days.
When reheating, I prefer the toaster for crispy edges or the microwave on 50% power for 10 seconds to maintain moisture. 💫
Nutrition facts
Frequently asked questions
Why does this recipe include pineapple?
Pineapple is the signature Hawaiian touch in this bread! It adds natural sweetness, moisture, and that bright tropical flavor that sets it apart from classic banana bread. The pineapple purée in the batter keeps the crumb tender, while the pineapple juice swirl creates beautiful marbling and prevents dryness.
Can I make this bread without macadamia nuts?
If you're avoiding nuts or prefer a different texture, swap the macadamia nuts for chopped walnuts or pecans. For a nut-free version, try toasted coconut flakes or dried pineapple chunks instead. The recipe will still taste delicious—just adjust the crunch level to your preference!
How do I know when the bread is fully baked?
The bread is done when a toothpick inserted in the center comes out clean (no wet batter) and the top is golden brown. Since this bread is extra moist, it might look underbaked at first—don't rely solely on color! Bake for the full 50-60 minutes and check with the toothpick test.
Can I use overripe bananas for this recipe?
Yes, in fact, you should! Overripe bananas with brown spots are sweeter and more flavorful, which enhances the tropical taste. If your bananas aren't ripe enough, place them in a paper bag with an apple for 2-3 days to speed up ripening. The darker the spots, the better the flavor!
What's the best way to store leftovers?
Wrap cooled slices tightly in plastic wrap or store in an airtight container to keep them fresh for 4-5 days at room temperature. For longer storage, freeze slices for up to 3 months. Reheat in the toaster or microwave for 10 seconds—warm slices taste even better!