
Side Dishes
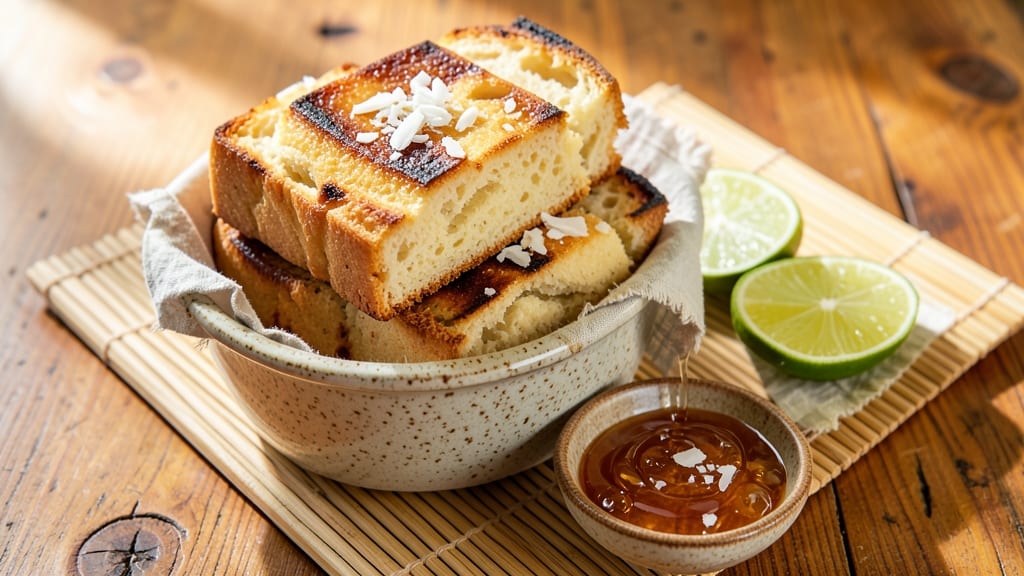
The Asian coconut bread recipe delivers that irresistible tropical fragrance and signature crunchy top that makes it a standout side dish. 🌴 This recipe captures the essence of Southeast Asian baking traditions, where coconut milk transforms simple bread into something richly aromatic and delightfully textured.
The secret lies in balancing sweetness with subtle coconut flavor, creating a loaf that's both comforting and sophisticated.
What sets this recipe apart is its foolproof method for achieving that perfect golden crust while keeping the interior tender and moist. You'll work with a straightforward dough that incorporates coconut milk, sugar, and a touch of vanilla for depth.
The bread bakes up with a crisp exterior that gives way to a soft, slightly sweet crumb—ideal for pairing with soups, teas, or enjoying on its own.
This recipe draws inspiration from Filipino pan de coco and Thai coconut-infused breads, offering a versatile base you can adapt with add-ins like shredded coconut or a hint of pandan extract. The result is a loaf that transports you to tropical shores with every slice. Ready to bake?
Perfect for breakfast, brunch, or as a sweet accompaniment to savory meals, this bread keeps well for days and freezes beautifully. Let's get started on creating your own tropical-inspired masterpiece.
Ingredients for asian coconut bread
Transform simple pantry staples into a fragrant tropical loaf with this Asian-inspired coconut bread recipe.
| Ingredient | Amount | Notes |
|---|---|---|
| All-Purpose Flour 🌾 | 4 cups | Sifted for even texture |
| Granulated Sugar 🍚 | ¾ cup | Light brown preferred |
| Unsalted Butter 🧈 | ½ cup | Cold, cubed for dough |
| Active Dry Yeast 🍞 | 2 ¼ tsp | Fresh yeast if available |
| Coconut Milk 🥥 | 13 ½ oz | Full-fat canned variety |
| Pure Vanilla Extract 🍯 | 1 tsp | High-quality preferred |
| Shredded Coconut 🥥 | 1 cup | Sweetened or unsweetened |
| Large Eggs 🥚 | 2 whole | Room temperature |
| Salt 🧂 | ½ tsp | Diamond Crystal preferred |
| Milk 🥛 | ¼ cup | Whole milk for richness |
| Pandan Extract 🌿 | ¼ tsp | Optional for authentic flavor |
| Granulated Sugar 🍚 | ½ cup | For bread topping |
| Unsalted Butter 🧈 | 2 tbsp | Melted for topping |
The coconut milk makes all the difference—opt for full-fat canned varieties like Thai Kitchen or Goya for authentic richness. Fresh pandan extract elevates the flavor profile, but vanilla alone still delivers tropical notes. For the flour, King Arthur or Bob's Red Mill brands yield consistent results. The yeast should be freshly opened—old packets lose potency quickly. Store-bought shredded coconut works, but toasted coconut adds deeper flavor (just dry-toast in a pan for 3-4 minutes).
No pandan extract? A pinch of turmeric plus extra vanilla mimics the floral aroma. Substitute coconut cream for coconut milk, but reduce to 12 oz to maintain moisture balance. Almond milk can replace regular milk, though the texture may be slightly less tender. For a nut-free version, omit the shredded coconut entirely. The bread freezes beautifully—slice before freezing to prevent a solid block. Gluten-free flour blends work if needed, though texture will differ slightly.
This loaf keeps at room temperature for 2 days wrapped in a clean kitchen towel, or up to 5 days refrigerated in an airtight container. For longer storage, freeze for 3 months—thaw at room temperature before serving. The crusty top develops best if baked on the middle rack. Brush with extra coconut milk during baking for enhanced browning. Portion into single slices for easy grab-and-go tropical treats.
Why You'll Love This Recipe
- No Yeast Fuss: I swear by this trick—just mix the coconut milk with warm water, yeast, and a pinch of sugar, then let it sit while I measure the dry stuff. Fifteen minutes later, it’s bubbly and ready. No proofing box, no waiting around.
- Tropical Twist: That first bite? Warm, buttery bread with a whisper of coconut sweetness—like a cross between a brioche and a mochi. The sugar caramelizes just enough to make it irresistible, and the butter keeps it rich without being heavy.
- Breakfast to Snack: Honestly, this bread works everywhere. Toast it for breakfast with peanut butter, pack slices with lunchmeat for a quick sandwich, or serve it warm with dinner. Even my picky teen grabs it straight from the pan.
- Pantry Powerhouse: Between us, this recipe uses stuff you already have—flour, sugar, butter—plus coconut milk, which is cheap and lasts forever. And the leftovers? They stay fresh for days, so you’re not scrambling to bake again midweek.
Step-by-step instructions for Asian coconut bread
Here's the method for crafting this fragrant bread with a perfect balance of moist crumb and crispy coconut topping.
👨🍳 Step 1: Activate the Yeast and Prepare the Dough
In a small bowl, combine the 13.5 oz coconut milk with the 0.75 cup granulated sugar and 2.25 tsp active dry yeast. Let this mixture sit for 5-10 minutes until it becomes frothy and bubbles form on the surface. This indicates the yeast is active and ready to work.
In a large mixing bowl, whisk together the 4 cups all-purpose flour (sifted), 0.5 tsp salt, and the 0.25 tsp pandan extract (if using). Add the yeast mixture, 2 whole large eggs, 0.25 cup milk, and 1 tsp pure vanilla extract to the dry ingredients. Mix until just combined, then add the 0.5 cup cold cubed unsalted butter and knead by hand or with a dough hook attachment for 8-10 minutes.
You're looking for a smooth, elastic dough that springs back when poked. If it feels too sticky, add 1 tablespoon flour at a time until it comes together. Once formed, cover the bowl with a damp towel and let the dough rise in a warm place for 1-1.5 hours or until it has doubled in size. The dough should feel light and airy when pressed gently.
🥘 Step 2: Shape and Prepare for Second Rise
Punch down the risen dough to release any air bubbles, then divide it into two equal portions. Shape each portion into a rectangular loaf, about 9x5 inches, with rounded edges. Place each loaf seam-side down in two greased 9x5-inch loaf pans.
Cover the pans with clean kitchen towels and let the dough rise again for 30-45 minutes until it has puffed up noticeably. The edges should pull away slightly from the sides of the pans, indicating it's ready for baking. Preheat your oven to 350°F while the dough rises—this ensures the oven is fully heated when you're ready to bake.
🔥 Step 3: Bake the Bread Until Golden Brown
Bake the loaves in the preheated oven for 30-35 minutes until the tops are deep golden brown and a toothpick inserted into the center comes out clean. The bread should have a slightly domed shape with a crisp exterior and soft interior.
While the bread bakes, prepare the coconut topping by mixing the 1 cup shredded coconut, 0.5 cup granulated sugar, and 2 tbsp melted unsalted butter in a small bowl. Once the bread has baked for 25 minutes, spoon this mixture evenly over the tops of both loaves. Return to the oven for the remaining 5-10 minutes to allow the topping to crisp.
⏰ Step 4: Cool and Serve for Perfect Texture
Remove the bread from the oven and let it cool in the pans for 10 minutes before transferring to a wire rack. This gradual cooling prevents the bread from becoming gummy. The coconut topping should be golden and crunchy, while the interior remains soft and moist.
For best results, serve the bread at room temperature. The aroma of coconut and pandan will fill your kitchen, and each slice should reveal a tender crumb with pockets of coconut flavor. Store any leftovers in an airtight container at room temperature for up to 3 days, or freeze for up to 3 months for freshness.
Pro Tips For Making Asian Coconut Bread
- Warm the Coconut Milk: Pour the coconut milk into a measuring cup and microwave it for 30 seconds before adding it to the dough—this prevents the butter from seizing up. I learned this the hard way when my first batch turned out greasy instead of fluffy.
- Measure Butter Cold: Scoop the unsalted butter straight from the fridge and cut it into cubes—no softening needed. Cold butter creates pockets of air in the dough, giving you that signature tender crumb. (Yes, even if you’re impatient like me.)
- Don’t Overproof the Dough: Watch for the dough to just about double in size, then stop—it’ll rise more in the oven. Overproofing makes the bread dense and gummy, and no one wants that. A good rule: poke it with a finger; if it springs back slowly, it’s ready.
- Brush with Coconut Milk: After baking, let the bread cool for 5 minutes, then brush the top with a little warmed coconut milk while it’s still hot. It adds a subtle sheen and extra flavor—worth the extra 30 seconds. (Your future self will notice.)
Essential equipment for this recipe
Loaf Pans
You'll need two 9x5-inch loaf pans for this recipe—I recommend Wilton Perfect Results pans for even baking and easy release. These pans create the classic rectangular shape perfect for slicing thick portions. Lightly grease them with coconut oil or line with parchment paper for extra insurance against sticking. 🌴
Mixing Tools
A stand mixer with dough hook attachment saves time and effort, but a wooden spoon and strong arms work too. For kneading by hand, I suggest a silicone spatula to help gather the dough.
If using a mixer, set it to speed 2 for the initial mixing and speed 3 for kneading to develop gluten properly.
Measuring Cups
Precision matters with baking, so invest in stainless steel measuring cups—they're durable and give accurate measurements. For the coconut milk, use a liquid measuring cup with clear markings.
The 13.5 oz requirement is critical for the perfect moisture balance in your dough. A digital kitchen scale can also help if you prefer weighing ingredients.
Yeast Proofing
Create a warm proofing environment by placing your dough bowl in a turned-off oven with a bowl of hot water (about 100°F). This mimics a professional bakery's proofing cabinet.
Alternatively, use a proofing box like the Breville Smart Oven Air Fryer if you have one—it maintains consistent temperatures for perfect rises every time. 🔥
Coconut Topping Tools
For the coconut topping, a small mixing bowl and rubber spatula work best to combine ingredients smoothly. I like to use a pint-sized glass bowl for easy spooning onto hot bread.
A pastry brush comes in handy for spreading any extra coconut milk over the loaves before baking to enhance browning.
Cooling Essentials
Let your bread cool on a wire cooling rack to prevent sogginess—never on the pan. I keep a large wire rack in my kitchen for this purpose. For quick cooling, place the rack over a baking sheet to catch any crumbs.
A damp kitchen towel draped over the rack helps maintain moisture while cooling. 💫
Nutrition facts
Frequently asked questions
Can I make this bread without pandan extract?
Yes! While pandan adds that authentic tropical aroma, you can substitute with ½ teaspoon turmeric plus ½ teaspoon vanilla extract for a similar floral note. For a simpler version, just use an extra ½ teaspoon vanilla extract—the coconut milk will still provide rich flavor. The bread will taste slightly different but remain delicious.
How do I prevent my coconut bread from being too dense?
Over-kneading or skipping the proofing steps most often causes dense bread. Knead only until the dough is smooth (8-10 minutes max), and let it rise until doubled in size both times. Also ensure your yeast is fresh—old yeast won't activate properly. For extra lightness, fold the dough gently after the first rise to incorporate air.
What's the best way to store leftover coconut bread?
Wrap the cooled loaf tightly in plastic wrap or place in an airtight container. It stays fresh at room temperature for 2-3 days or in the fridge for 5 days. For longer storage, slice and freeze—it reheats beautifully in a 350°F oven for 5-7 minutes to restore crispiness. The coconut topping may soften slightly when reheated.
Can I add other tropical flavors to this recipe?
Try adding ½ teaspoon grated lime zest or 1 teaspoon toasted coconut extract to the dough for extra brightness. For a spiced version, mix ½ teaspoon cinnamon with the sugar in the topping. You could also fold in chopped macadamia nuts or dried pineapple pieces for texture—just reduce the shredded coconut by ¼ cup to balance.
Why did my coconut topping turn out too sweet?
The sugar-to-coconut ratio is key here. For less sweetness, reduce the sugar in the topping to ¼ cup while keeping the 1 cup shredded coconut. If you prefer a caramelized flavor, try adding 1 tablespoon brown sugar instead of white. Taste before applying to adjust—you can always add more coconut if needed.