
Side Dishes
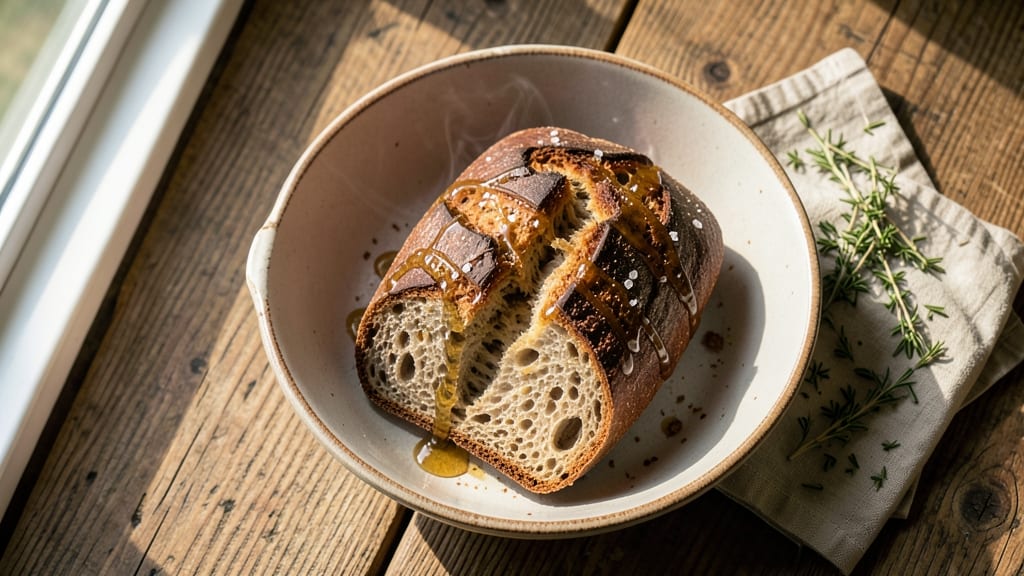
This artisan whole wheat sourdough bread recipe delivers the perfect balance of rustic texture and nutty depth—crusty crust, tender crumb, and a fermented complexity that rivals artisanal bakeries. The secret lies in a well-fed sourdough starter and patient fermentation, which transforms simple whole wheat flour into something extraordinary.
Unlike dense commercial loaves, this recipe achieves an open crumb structure and satisfying chew through precise technique and timing.
What sets this bread apart is the two-stage fermentation—an initial bulk fermentation followed by a slow cold proof in the fridge. This not only develops flavor but also allows the gluten to relax, making shaping easier and yielding a lighter crumb.
The whole wheat flour adds earthy notes and fiber, while a touch of honey in the dough enhances browning and sweetness without overpowering the sourdough tang. Every element works together to create a loaf that’s both nutritious and deeply satisfying.
The result is a golden-brown crust with shatteringly crisp edges and a crumb that’s airy yet substantial, perfect for toast, sandwiches, or serving alongside soups. This recipe builds on traditional methods with modern adjustments for home bakers—no expensive equipment needed, just time and attention to detail.
Whether you're a seasoned baker or new to sourdough, the step-by-step process ensures success without guesswork.
For those who love customization, optional additions like seeds, herbs, or even a sprinkle of flaky salt on top can elevate the flavor further. The beauty of sourdough lies in its adaptability, but the core technique remains the same: patience and care.
Let’s get started on creating your own artisan loaf from scratch.
Ingredients for artisan whole wheat sourdough bread
Fourteen ingredients transform simple flour into rustic, nutty sourdough perfection with crusty crunch and open crumb.
| Ingredient | Amount | Notes |
|---|---|---|
| Active Sourdough Starter 🍞 | ½ cup | Well-fed, bubbly starter with 1:1:1 ratio |
| Whole Wheat Flour 🌾 | 3 ½ cups | High-protein, freshly milled preferred |
| Bread Flour 🌾 | 1 cup | For improved gluten structure |
| Pure Water 💧 | 1 ¾ cups | Room temperature, filtered preferred |
| Raw Honey 🍯 | 1 tbsp | Enhances browning and sweetness |
| Sea Salt 🧂 | 1 ½ tsp | Fine grain, Diamond Crystal preferred |
| Olive Oil 🫒 | 1 tbsp | Extra-virgin for richness |
| Instant Yeast 🍞 | ¼ tsp | Optional for backup fermentation |
| Semolina Flour 🌾 | ¼ cup | For dusting and crust enhancement |
| Flaky Sea Salt 🧂 | 1 tsp | For final crust sprinkle |
| Optional Add-Ins 🌱 | ½ cup | Seeds, herbs, or nuts for customization |
The sourdough starter is non-negotiable—it should be active, bubbly, and have a 1:1:1 ratio of starter to flour to water when fed 12 hours prior. King Arthur or Bob's Red Mill whole wheat flours deliver superior texture, though any high-protein whole wheat works. For the bread flour, Caputo or King Arthur are ideal for their high gluten content. The honey should be raw and unprocessed—local varieties add subtle floral notes. Store your starter in a glass jar with a loose lid to allow gas exchange while preventing contamination.
No sourdough starter? Instant yeast at half the amount can kickstart fermentation, though flavor will differ. Substitute honey with maple syrup or agave for vegan options, though honey enhances browning. For flaky sea salt, Maldon or Jacobsen are superior, but any fine sea salt works. Optional add-ins like sunflower seeds or rosemary can be omitted entirely—this recipe shines with just the base ingredients. If using seeds, toast them lightly in a dry pan first to enhance flavor. The olive oil should be extra-virgin and fruity—avoid refined oils that lack depth.
Store your starter in the fridge between bakes to maintain vitality for up to 2 weeks. The dough itself requires 24 hours total fermentation time, including an overnight cold proof in the fridge for optimal flavor development. Once baked, the loaf stays fresh for 3-4 days at room temperature, wrapped in a cotton towel. For longer storage, freeze slices wrapped in parchment paper for up to 3 months. The crust is best enjoyed within 2 days of baking—its crispness softens over time, but the crumb remains delightfully open.
Why You'll Love This Recipe
- I’ll be real: this bread feels like a luxury, but the dough just stays in a bowl overnight. No punchy arm work, no stress—just wake up to that golden crust and nutty whole wheat aroma filling your kitchen. The starter does all the heavy lifting while you sleep.
- No-Knead Magic: I’ll be real: this bread feels like a luxury, but the dough just stays in a bowl overnight. No punchy arm work, no stress—just wake up to that golden crust and nutty whole wheat aroma filling your kitchen. The starter does all the heavy lifting while you sleep.
- Honeyed Depth: That raw honey isn’t just for sweetness—it caramelizes into the crust, giving it this irresistible balance of earthy whole wheat and subtle floral notes. Honestly, the first slice out of the oven makes me pause mid-bite like, "Wait, is this actually homemade?"
- Lunchbox Hero: Between us, this bread is my go-to for packed lunches—stays fresh for days when wrapped tightly, and the hearty whole wheat keeps everyone full. Toss in some avocado or cheese, and it’s suddenly the star of any meal, no fuss.
Step-by-step instructions for artisan whole wheat sourdough bread
Mastering this recipe delivers a loaf with deep fermentation flavor and an irresistible crusty exterior.
Combine Wet Ingredients and Hydrate the Starter
In a large mixing bowl, combine the 1.75 cups pure water, 1 tbsp raw honey, and 1 tbsp olive oil. Stir until the honey dissolves completely. This creates a base that will help develop the bread's structure and enhance browning during baking.
Add the 0.5 cup active sourdough starter to the water mixture. Using a flexible spatula, gently fold the starter into the liquid until fully incorporated. The starter should be well-fed and bubbly—this indicates it's ready to work. Let this mixture sit at room temperature for 10 minutes while you prepare the dry ingredients. The starter will begin activating, creating tiny bubbles that signal fermentation is underway.
Mix Dry Ingredients and Form the Dough
In a separate bowl, whisk together the 3.5 cups whole wheat flour, 1 cup bread flour, 1.5 tsp sea salt, and 0.25 tsp instant yeast. The bread flour adds strength to compensate for the whole wheat's lower gluten content. Sift the mixture lightly to aerate the flour and create a more uniform texture.
Gradually add the dry ingredients to the wet starter mixture, stirring with the spatula. Start with half the flour and mix until combined, then add the remaining flour. The dough will be shaggy at first—this is normal. After all the flour is incorporated, knead the dough gently by hand for 5-7 minutes until it becomes smooth and elastic. You're looking for a dough that pulls away from the sides of the bowl and springs back when poked. If it feels too sticky, add 1 tablespoon of flour at a time until it reaches the right consistency.
Bulk Ferment for Optimal Flavor Development
Transfer the dough to a lightly oiled bowl, cover it with a damp kitchen towel, and let it rest at room temperature for 4-6 hours. This bulk fermentation period allows the dough to develop flavor and structure. I recommend checking the dough after 2 hours—it should have nearly doubled in size and show signs of activity with bubbles forming on the surface. If your kitchen is cool, extend the fermentation time to 8 hours for enhanced flavor.
During this time, the yeast and starter will work together to break down the gluten and create gas bubbles. The dough should feel spongy and slightly jiggly when gently pressed. If the dough doesn't rise significantly after 6 hours, it may need additional time—up to 12 hours in a warm environment. The longer you ferment, the more complex flavors you'll develop, but don't exceed 16 hours or the dough may overproof.
Shape and Final Proof
Lightly flour a clean work surface and turn out the fermented dough. Gently shape it into a round boule by pulling the edges toward the center and tucking them under. This technique creates surface tension that helps develop the bread's structure. Place the shaped dough seam-side down in a lightly oiled bowl, cover it again, and let it proof for 1-2 hours until it has risen by about 50%. The dough should feel firm when pressed gently—it should spring back slowly rather than immediately.
For a more rustic look, you can shape the dough into a batard (an elongated oval) instead of a boule. Dust the surface with 0.25 cup semolina flour before shaping to prevent sticking. The semolina adds a beautiful golden crust and enhances the bread's texture. If you're adding optional ingredients like seeds or nuts, sprinkle them lightly over the surface now before the final proof.
Bake for Crusty Perfection
Preheat your oven to 450°F with a Dutch oven inside for 45 minutes. This step ensures the bread gets a proper head start with intense heat. Carefully transfer the shaped dough to a parchment-lined baking sheet, then invert the Dutch oven onto the dough. The lid should create a steam chamber that promotes even baking and a crispy crust.
Bake the bread for 30 minutes with the lid on, then remove the lid and continue baking for an additional 15-20 minutes until the crust is deep golden brown and the internal temperature reaches 205-210°F. Tap the bottom of the loaf—it should sound hollow when done. In the final minutes of baking, sprinkle the 1 tsp flaky sea salt over the top for a finishing touch. The bread is done when it's deeply colored and smells rich and toasty.
Cool and Enjoy
Remove the bread from the oven and transfer it to a wire rack. Let it cool completely for at least 1 hour before slicing. This resting period allows the bread to set and prevents a gummy interior. The crust should be crisp and shatterable, while the crumb inside should be open and airy with pockets of steam.
Slice the bread with a serrated knife for clean cuts. The interior should reveal an even crumb structure with a slight sheen from the fermentation process. Serve warm with your favorite butter or olive oil for the ultimate artisanal experience. This bread keeps well at room temperature for 2-3 days or can be frozen for up to 3 months for fresh slices whenever you need them.
Pro Tips For Making Artisan Whole Wheat Sourdough Bread
- Use Bread Flour for Structure: Whole wheat flour absorbs more water and weighs down dough—mix at least 30% bread flour to keep the crumb light and airy. I learned this the hard way when my first batch turned out dense as a brick.
- Autolyse Before Mixing: Let the whole wheat flour and water sit uncovered for 30 minutes before adding starter and honey—this relaxes the gluten and makes kneading easier. Sounds weird, but it works: your dough will handle folding like a dream.
- Skip Overproofing the Dough: Whole wheat ferments faster than white flour; check for readiness when dough springs back slowly (not instantly) when poked. I’ve ruined batches by waiting too long—your bread won’t rise properly if you ignore this.
- Hydrate the Whole Wheat First: Mix the whole wheat flour with water separately before combining with bread flour—this prevents clumping and ensures even hydration. Does it look messy? Yes. Does it work? Every single time.
Health benefits of this dish
Whole Grain Powerhouse
This whole wheat sourdough delivers 16 grams of fiber per loaf—that's 64% of your daily needs—thanks to the whole grain flour. Fiber supports digestive health by promoting regularity and feeding beneficial gut bacteria.
The slow fermentation process also enhances nutrient bioavailability, helping your body absorb more minerals like magnesium and zinc from the whole wheat. 🌱
Probiotic Benefits
The sourdough starter introduces natural probiotics that improve gut microbiome balance. These beneficial bacteria help break down complex carbohydrates and may reduce bloating. Studies show sourdough fermentation increases digestibility compared to regular yeast breads, making this loaf gentler on your stomach while still delivering satisfying texture.
The longer fermentation also reduces gluten content slightly, which can be easier on sensitive systems.
Complex Carbohydrates
Unlike refined white bread, this whole wheat version provides slow-digesting carbohydrates that stabilize blood sugar levels. The combination of whole grains and fermentation creates a lower glycemic impact, making it ideal for balanced meals.
I notice my energy levels stay steady for hours after eating this bread, unlike quick-spiking white bread alternatives. The honey adds just enough natural sweetness to enhance flavor without compromising these benefits.
Natural Preservation
The fermentation process creates natural preservatives through lactic and acetic acids, which extend freshness without artificial additives. This bread stays moist and flavorful for 3-4 days at room temperature compared to 1-2 days for commercial loaves.
The absence of preservatives means you get pure, unadulterated nutrition without hidden ingredients. For longer storage, freezing maintains texture and flavor for up to 3 months.
Nutrient-Dense Additions
Optional add-ins like sunflower seeds or flaxseeds boost this bread's nutritional profile even further. Sunflower seeds add vitamin E and healthy fats, while flaxseeds provide omega-3 fatty acids. These additions create a nutrient-dense loaf that supports heart health and inflammation reduction.
I often sprinkle 1 tbsp ground flaxseed into the dough for an extra omega-3 boost without altering texture significantly. 💫
Low-Calorie Density
Despite its hearty texture, this bread maintains a moderate calorie count—about 180 calories per slice—while delivering substantial volume and satisfaction. The fermentation process creates an open crumb structure that makes each slice feel more substantial than dense commercial breads.
This makes it an excellent choice for those monitoring calorie intake while still wanting a filling, nutritious loaf. The whole wheat flour adds natural sweetness that reduces cravings for sugary alternatives.
Nutrition facts
Frequently asked questions
Why does this recipe use both whole wheat and bread flour?
Whole wheat flour adds nutty flavor and fiber, but its lower gluten content can make the dough dense. The bread flour provides the extra protein needed for a proper rise and open crumb structure. This blend gives you the best of both worlds—nutritional benefits with excellent texture.
How do I know when my sourdough starter is ready?
A ready starter should be bubbly, have a slightly domed top, and double in size within 4-6 hours after feeding. It should also smell tangy (like yogurt or vinegar) but not overly sour. If it's sluggish, feed it with equal parts flour and water and wait another 12 hours before using.
Can I skip the cold proof in the fridge?
While possible, skipping the overnight cold proof reduces flavor development and can make the crumb denser. The cold slows fermentation, allowing enzymes to break down gluten and starches for better texture and taste. If you're short on time, proof at room temperature for 2-3 hours instead, but expect slightly less complexity.
What if my dough doesn't rise during bulk fermentation?
Check your starter first—it may need refreshing. If the starter is active but the dough still doesn't rise, your kitchen might be too cold (below 70°F). Try placing the dough in a warm spot (like near the oven with the light on) or extend fermentation to 12 hours. If it still fails, add ¼ tsp extra yeast next time.
How can I make this bread more digestible?
For easier digestion, extend the bulk fermentation to 12-16 hours—this breaks down gluten and phytic acid. You can also substitute ½ cup of the whole wheat flour with spelt flour, which has lower gluten content. Soaking the whole wheat flour in water for 1 hour before mixing also improves digestibility.