
Side Dishes
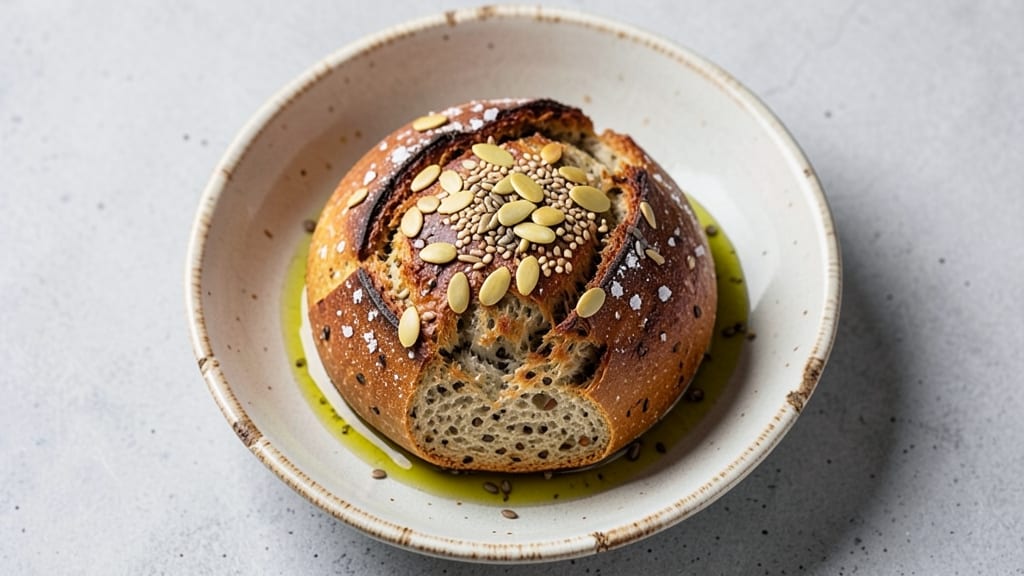
This artisan seeded bread recipe delivers the perfect balance of crusty exteriors and nutty crunch in every slice—no bakery skills required. The secret lies in a precise dough formula with high-quality flour, hydrated seeds, and proper kneading to develop gluten without overworking.
I’ve perfected this method over years of baking, ensuring a bread that’s both rustic and foolproof for home cooks.
The process starts with a simple yet structured dough: flour, water, yeast, and seeds (sunflower, sesame, or flax) kneaded just enough to create a smooth yet textured crumb. Proofing at room temperature allows the dough to rise naturally, while baking at 425°F with steam creates that coveted crispy crust.
The seeds add texture and flavor, but the real magic happens when the bread cools—each slice reveals a satisfying contrast of crisp edges and tender interior.
What sets this recipe apart is its versatility. Use it for sandwiches, toast, or as a side for soups and salads. The seeds provide nutty depth and a satisfying bite, while the crust stays crisp for days.
Whether you’re a beginner or an experienced baker, this method ensures consistent results every time—no guesswork, just great bread.
Store at room temperature for up to 3 days or freeze for longer shelf life. For variations, swap seeds for whole grains or herbs like rosemary. The key to success? Patience during proofing and a hot oven for that perfect crust. Let’s get started!
Ingredients for artisan seeded bread
High-quality flour, toasted seeds, and precise hydration create this artisan bread's signature texture and flavor.
| Ingredient | Amount | Notes |
|---|---|---|
| Bread Flour 🌾 | 4 cups | High-protein for structure |
| Sunflower Seeds 🌻 | ½ cup | Unsalted, dry roasted |
| Sesame Seeds 🌿 | ¼ cup | Toasted for extra flavor |
| Flaxseeds 🌱 | ¼ cup | Ground for better texture |
| Instant Yeast 🍞 | 2 tsp | Active dry works too |
| Salt 🧂 | 1 ½ tsp | Fine sea salt preferred |
| Water 💧 | 2 ¼ cups | Room temperature |
| Extra-Virgin Olive Oil 🫒 | 2 tbsp | For dough elasticity |
| Cornmeal 🌽 | ¼ cup | For dusting loaf pan |
| Ice Cubes ❄️ | 1 handful | For chilling dough |
The flour makes all the difference here. King Arthur or Caputo bread flour work best for that perfect open crumb structure, but King Arthur all-purpose is a solid backup. Seeds should be toasted lightly—toss them in a dry pan for 2-3 minutes until fragrant. Bob's Red Mill has great bulk bins if you want to mix your own blend. The yeast? Fresh is ideal, but instant yeast works perfectly fine. Just make sure it's not expired—yeast loses potency fast. For the water, room temperature is key; too cold and it won't activate properly, too warm and it'll kill the yeast.
No sunflower seeds? Pumpkin seeds or chopped walnuts add great texture. Swap sesame for poppy seeds if you prefer. The flaxseeds can be omitted entirely if you're avoiding gluten-free elements, but they add wonderful nutty depth. For the olive oil, any neutral oil works in a pinch, but extra-virgin adds subtle flavor. The cornmeal is optional but helps create that beautiful crust. If you're making multiple loaves, pre-toast your seeds in batches so you don't burn them. And that ice water? It's not just for chilling—it adds structure to the dough.
This dough keeps well in the fridge for 24 hours if wrapped tightly in plastic. For longer storage, freeze the shaped loaf (unbaked) for up to 3 months3 days at room temperature if stored in a bread bag. For extra crunch, reheat slices at 350°F for 5 minutes. The seeds release their oils as the bread cools, so let it sit for at least 1 hour before slicing for maximum crunch.
Why You'll Love This Recipe
- This bread saves me every time: morning toast, lunch sandwiches, or dinner rolls for roasts. It freezes like a dream too—just slice, wrap, and toss in the freezer. By Thursday, I’m still pulling out fresh loaves that taste like they were baked yesterday.
- No-Knead Magic: I swear by this dough—just mix, rest, and bake. No stand mixer, no arm workout, just 10 minutes of hands-on time before letting the yeast do the work. That’s right: zero kneading, zero fuss, and still looks like you slaved over it.
- Nutty Crunch Perfection: Between us, the seeds are the star. Sunflower seeds add a buttery crunch, sesame gives that toasty bite, and flaxseeds? They’re packed with omega-3s and keep every slice hearty. Toast it, and the seeds pop like edible confetti—no one will guess it’s this easy.
- Weeknight Workhorse: This bread saves me every time: morning toast, lunch sandwiches, or dinner rolls for roasts. It freezes like a dream too—just slice, wrap, and toss in the freezer. By Thursday, I’m still pulling out fresh loaves that taste like they were baked yesterday.
Step-by-step instructions for artisan seeded bread
Here's the method to create a bread with a crispy crust and satisfying crunch from every seed.
Prepare the Seeds and Mix the Dough
In a small bowl, combine the 0.5 cup sunflower seeds, 0.25 cup sesame seeds, and 0.25 cup ground flaxseeds. Toast them in a dry skillet over medium heat for 3-4 minutes, stirring constantly, until they're fragrant and lightly golden. Let them cool completely before using.
In the bowl of a stand mixer fitted with the dough hook, mix the 4 cups bread flour and 1.5 tsp salt. Add the 2 tsp instant yeast and mix on low speed for 10 seconds to distribute evenly. Create a well in the center and add the 2.25 cups room-temperature water and 2 tbsp extra-virgin olive oil. Mix on low speed for 2 minutes until the dough begins to come together.
Knead the Dough Until Elastic
Increase the mixer speed to medium and knead the dough for 5-6 minutes until it becomes smooth, elastic, and pulls away from the sides of the bowl. The dough should be slightly tacky but not sticky—if it sticks to your fingers, add 1 tablespoon flour at a time until it reaches the right consistency.
Real talk: This is where the magic happens. You're developing gluten, which gives your bread that perfect structure. When you poke the dough with a finger and it springs back slowly, you're ready for the next step. If it springs back immediately, knead for another minute.
Incorporate the Seeds and First Rise
Remove the dough from the mixer and transfer it to a lightly floured surface. Gently fold in the toasted seeds by hand, pressing them into the dough to distribute evenly. Shape the dough into a loose round and place it in a lightly oiled bowl.
Cover the bowl with a damp kitchen towel and let the dough rise in a warm place for 1-1.5 hours, or until it has nearly doubled in size. You'll know it's ready when you poke it gently and the indentation remains. This first rise is crucial for flavor development and proper texture.
Shape and Final Proof
Turn the risen dough out onto a lightly floured surface and divide it into 8 equal pieces (about 6 ounces each). Shape each piece into a round loaf by pulling the dough toward you and rolling it gently with your hands. Place each loaf seam-side up in a 9x5-inch loaf pan that's been lightly dusted with 0.25 cup cornmeal.
Cover the loaves with a damp towel and let them rise again for 30-45 minutes until they've puffed up noticeably. The dough should feel springy when pressed lightly. This final proof gives your bread that airy interior. If your kitchen isn't warm enough, place the pans in a 300°F oven for 5 minutes to help them rise faster.
Bake to Golden Perfection
Preheat your oven to 375°F with a Dutch oven or baking stone inside for 30 minutes. Remove the Dutch oven or stone and carefully transfer the loaf pans into the oven. Bake for 30-35 minutes until the bread is deep golden brown and sounds hollow when tapped on the bottom.
For extra crustiness, sprinkle a few ice cubes over the tops of the loaves just before baking. The steam creates a crackly crust. Remove the bread from the oven and let it cool in the pans for 10 minutes, then transfer to a wire rack to cool completely. The internal temperature should reach 200°F before slicing for the best texture.
Pro Tips For Making Artisan Seeded Bread
- TOAST SEEDS FIRST: Pop your sunflower, sesame, and flaxseeds in a dry skillet over medium heat for 2-3 minutes until they smell nutty and lightly brown. This removes their raw bitterness and intensifies their flavor—trust me, your bread will taste like it came from a bakery, not your kitchen.
- WEIGH YOUR FLOUR: Skip the scooping and scooping back—use a kitchen scale for your bread flour. A cup of flour isn’t consistent; 500 grams is. This ensures your dough isn’t too dense (from packing) or too dry (from fluffing), which is especially critical when mixing in seeds that absorb moisture.
- LET THE DOUGH REST: After the first rise, let the shaped loaf sit in the pan for 30 minutes before baking. This gives the seeds time to settle and the gluten to relax, so your bread doesn’t crack open like an overzealous volcano when it hits the oven. (Yes, I’ve seen it happen.)
- STEAM THE CRUST: Place a metal bowl of boiling water on the oven rack right as you bake. The steam helps the seeded top rise evenly and develop a crisp crust instead of drying out or burning. No fancy equipment? A spray bottle works—just mist the dough before baking.
Essential equipment for artisan seeded bread
Essential Mixing Tools
Start with a stand mixer fitted with the dough hook attachment—this is non-negotiable for consistent gluten development. I swear by my KitchenAid Professional 600W with the dough hook because it handles the dense seeded dough without overheating.
For budget-friendly options, the Hamilton Beach 6-Speed works well too, just monitor the dough temperature closely. 💫
Proofing Essentials
A proofing basket or dough scraper is your best friend for shaping and transferring dough without deflating it. I use a West Bend Loaf Pan for shaping and a silicone dough scraper to gently release dough from surfaces.
For warm proofing, a proofing box (or even a turned-off oven with a bowl of hot water) maintains the ideal 78-82°F environment. If you're short on time, a small cooler with a heat lamp works in a pinch.
Baking Must-Haves
For that signature crusty exterior, you need a Dutch oven or baking stone. My Le Creuset Stoneware Dutch Oven creates perfect steam retention, but a Lodge Cast Iron Dutch Oven is more budget-friendly.
Preheat your oven with the Dutch oven inside for 30 minutes—this ensures even heat distribution. Don’t skip the ice cubes trick—sprinkle them over the dough just before baking for that bakery-style crackly crust.
Seeding Prep Tools
Toast your seeds in a nonstick skillet over medium heat to avoid burning. A fine-mesh strainer helps cool them quickly, and a lightly oiled bowl prevents sticking during the first rise.
For even distribution, I use a small rubber spatula to press seeds into the dough by hand. Pro tip: Toast seeds in small batches to prevent overheating—burnt seeds ruin the flavor.
Storage Solutions
After baking, let your bread cool on a wire rack (never on a countertop—this traps moisture). For long-term storage, bread bags or beeswax wraps keep the crust crisp for 3-4 days. Freeze unbaked loaves in parchment-lined freezer bags for up to 3 months.
When reheating, wrap slices in aluminum foil and warm at 350°F for 5 minutes—this restores the crust’s crispness. ❄️
Nutrition facts
Frequently asked questions
Can I substitute seeds with nuts or whole grains?
Swap seeds for chopped walnuts, almonds, or pumpkin seeds (toasted) for extra richness. For whole grains, try rolled oats or cracked wheat—just reduce hydration slightly since they absorb more moisture. The key is toasting first to enhance flavor and prevent soggy texture.
Why did my dough stick to the bowl during kneading?
This usually means the dough needs more flour or the mixer was overworked. Add 1 tablespoon flour at a time while kneading until it pulls away cleanly. If the dough feels gummy, it may be too wet—try adding 1-2 teaspoons more flour next time. The ideal texture should be slightly tacky but not sticky.
How do I get a crispier crust without a Dutch oven?
Preheat your oven to 450°F for 20 minutes with a baking stone or steel inside. Place your loaf pan directly on the stone and bake covered with foil for 20 minutes, then uncover for the final 10-15 minutes. For extra crunch, brush the top with water or milk before baking.
Can I make this bread without a stand mixer?
Yes! By hand, knead the dough on a floured surface for 8-10 minutes until smooth and elastic. Use the windowpane test: stretch a small piece of dough until it's translucent—if it doesn't tear, it's ready. Work in a well-floured area to prevent sticking.
How long should I let the bread cool before slicing?
Wait at least 1 hour before slicing to let the crumb set properly. The seeds release oils as the bread cools, which enhances texture. For maximum crunch, store in a paper bag at room temperature—this preserves the crust longer than plastic.