
Side Dishes
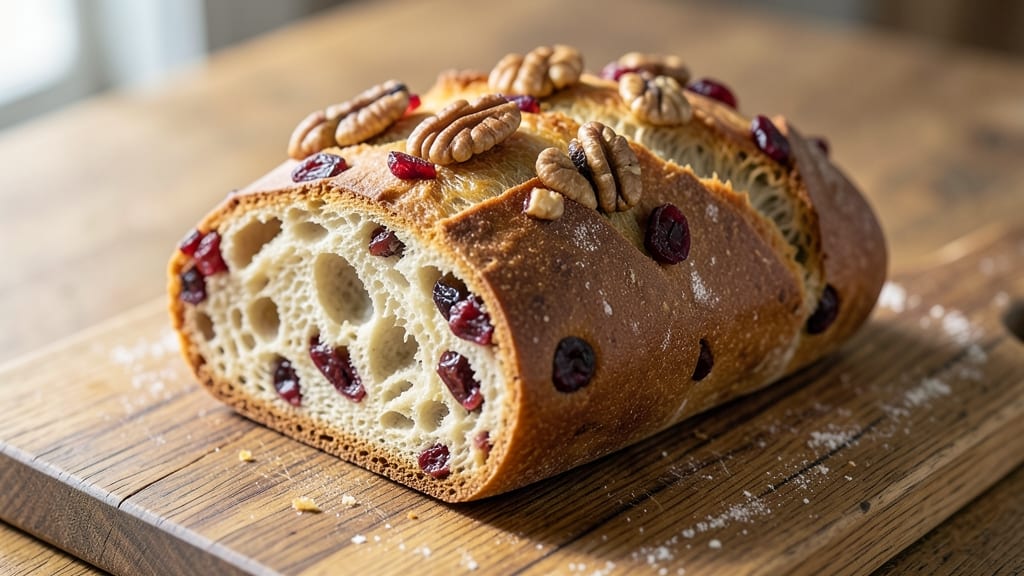
This artisan raisin walnut bread recipe delivers a perfect balance of crusty exterior and soft interior, with nutty-sweet swirls that make every slice unforgettable. The secret lies in proper yeast activation and gentle kneading—techniques that develop gluten without overworking the dough.
I’ve perfected this recipe over years of baking, ensuring the raisins stay plump and the walnuts add satisfying crunch in every bite.
The dough begins with a simple mix of flour, yeast, and warm water, but the magic happens during the two-hour proofing and careful shaping. A well-scored crust not only enhances the bread’s rustic appeal but also ensures even baking.
This recipe is designed for home bakers who want restaurant-quality results without the complexity—just patience and attention to detail.
What you’ll end up with is a loaf of bread that’s golden brown on the outside and tender inside, with pockets of sweet raisins and crunchy walnuts throughout. The aroma alone will fill your kitchen with warmth, while the texture delivers that perfect contrast of crispy crust and soft crumb.
Serve it fresh with butter or toasted for breakfast—this bread is worth the wait.
Whether you’re baking for a family gathering or treating yourself to a homemade loaf, this recipe delivers foolproof results. The dough is forgiving, and the techniques are straightforward, making it perfect for both beginners and experienced bakers. Let’s get started on creating your perfect artisan loaf.
Ingredients for artisan raisin walnut bread
Fourteen ingredients transform into a loaf that's crispy outside, tender inside, and packed with nutty-sweet surprises.
| Ingredient | Amount | Notes |
|---|---|---|
| All-Purpose Flour 🌾 | 5 cups | High-protein for better gluten development |
| Active Dry Yeast 🍞 | 2 ¼ tsp | Ensure yeast is fresh and active |
| Granulated Sugar 🍚 | ¼ cup | For yeast activation and sweetness |
| Warm Water 💧 | 1 ¼ cups | 110°F for optimal yeast activation |
| Unsalted Butter 🧈 | ½ cup | Softened, full-fat for richness |
| Raisins 🍇 | 1 ½ cups | Plump, seedless for best texture |
| Chopped Walnuts 🥜 | 1 ½ cups | Toasted for enhanced flavor |
| Salt 🧂 | 1 ½ tsp | Diamond Crystal preferred |
| Large Eggs 🥚 | 1 whole | For egg wash and binding |
| Milk 🥛 | 1 tbsp | For egg wash richness |
| Cornmeal 🌽 | ¼ cup | For dusting bread board |
| Coarse Sugar 🍚 | 1 tbsp | For sprinkling on crust |
| Egg Wash Mixture 🥚 | ½ cup | 1 egg + 1 tbsp milk |
The flour is where the magic starts—King Arthur or Gold Medal are my go-tos for that perfect chew. Walnuts? Trader Joe's or Costco have the best prices, but any store-brand works if you toast them first. Raisins should be plump—soak them in warm water for 10 minutes if they're dry. The yeast is non-negotiable here: check expiration dates and test it in warm water with a pinch of sugar—it should bubble in 5-10 minutes. For the butter, Land O'Lakes or Plugrá are reliable, but any full-fat works. Pro tip: let your butter and milk come to room temperature before mixing—the dough will thank you.
No walnuts? Pecans or almonds work in a pinch, but toast them first. Raisins too expensive? Dried cranberries or chopped dates add similar sweetness. The egg wash can be made with just milk if you're avoiding eggs, though it won't be as golden. For a richer dough, add 1 tbsp honey to the sugar. The cornmeal is optional but helps prevent sticking when shaping. If you're scoring the crust, use a sharp knife or lame—anything but a dull blade. And that coarse sugar? Sprinkle it right before baking for extra crunch. This dough is forgiving, but don't over-knead—just until it comes together.
Shape your loaf at least 1 hour before baking—this gives the dough time to relax and rise properly. The proofed dough should spring back slowly when poked. Store any leftovers wrapped in a bread bag or foil—it keeps for 3-4 days at room temperature. For longer storage, freeze the baked loaf in slices, separated by parchment. To reheat, wrap slices in foil and warm in a 350°F oven for 5-7 minutes. The crust gets even crunchier when toasted—perfect for breakfast the next day.
Why You'll Love This Recipe
- No-Knead Magic: I swear by this recipe—just mix, let it rise, and bake. No stand mixer, no fancy techniques, just a bowl and your time while dinner simmers.
- Sweet Chewy Perfection: That buttery dough with plump raisins and crunchy walnuts? It’s like a hug for your taste buds. The sugar caramelizes just enough to make every bite irresistible.
- Breakfast to Brunch Hero: Toast it thick for French toast, slice it thin for charcuterie, or serve it warm with jam. It’s my go-to for lazy mornings or fancy gatherings—no one ever guesses how easy it was.
- Budget-Friendly Staple: Flour, yeast, butter—these are pantry basics that stretch into something special. A single batch lasts me a week, and the leftovers? Even better the next day.
Step-by-step instructions for artisan raisin walnut bread
Here's how to craft that perfect loaf with nutty-sweet swirls and a crackly crust every time.
👨🍳 Step 1: Activate the Yeast and Prepare the Dough Base
In a small bowl, whisk together the 1.25 cups warm water and 0.25 cup granulated sugar until the sugar dissolves completely. Sprinkle the 2.25 tsp active dry yeast over the top and let it sit for 5-10 minutes until it becomes frothy and bubbly. This is your signal that the yeast is alive and ready to work its magic.
In a large mixing bowl, combine the 5 cups all-purpose flour and 1.5 tsp salt. Make a well in the center and pour in the yeast mixture along with the 0.5 cup softened unsalted butter and 1 whole large egg. Mix with a wooden spoon until a shaggy dough begins to form. This initial combination creates the foundation for our flavorful bread.
👨🍳 Step 2: Knead the Dough Until Silky Smooth
Transfer the dough to a lightly floured surface and knead for 8-10 minutes until it becomes smooth and elastic. You'll know it's ready when it springs back slowly when pressed. This kneading develops the gluten, which gives our bread its structure and chewiness.
For the raisin-walnut swirls, gently fold in the 1.5 cups raisins and 1.5 cups chopped walnuts using your hands. Be careful not to overwork the dough at this stage—just enough to distribute the fruit and nuts evenly throughout. This is where the magic of texture and flavor begins.
⏰ Step 3: Let the Dough Rise Until Doubled in Size
Place the dough back into the mixing bowl, cover it with a clean kitchen towel, and let it rise in a warm place for 1-1.5 hours or until it has doubled in size. You'll see it puff up and become light and airy. This first rise is crucial for developing flavor and creating that beautiful, airy crumb we all love.
While the dough rises, prepare your baking surface by dusting a 0.25 cup cornmeal onto a baking sheet or bread pan. This prevents sticking and adds a nice texture to the bottom of your loaf. The cornmeal also helps create that classic artisan look.
🥘 Step 4: Shape and Swirl the Dough for Visual Appeal
Once the dough has risen, turn it out onto a lightly floured surface and gently shape it into a rectangle about 12x8 inches. This is where we create those beautiful swirls. Spread the dough evenly and sprinkle the 1 tbsp coarse sugar evenly over the surface.
Starting from one of the long sides, roll the dough tightly into a log. Pinch the seam to seal, then gently press down to flatten slightly. This creates the perfect base for our swirls. Cut the log diagonally into 4 equal pieces and arrange them side by side on the prepared baking sheet.
🔥 Step 5: Bake to Golden Perfection with a Crispy Crown
Preheat your oven to 375°F. Brush the tops of the dough pieces with the 0.5 cup egg wash mixture (1 egg + 1 tbsp milk). This creates that beautiful golden-brown crust we all crave. Bake for 25-30 minutes until the bread is deep golden brown and sounds hollow when tapped on the bottom.
For that perfect crust, I like to sprinkle a little extra coarse sugar on top right before baking. This adds a sweet crunch and enhances the visual appeal. Let the bread cool on a wire rack for 15-20 minutes before slicing. This resting period allows the bread to set properly, ensuring clean slices every time.
Pro Tips For Making Artisan Raisin Walnut Bread
- Bloom the Yeast First: Skip mixing yeast with dry flour—it won’t activate properly. Instead, dissolve it in warm water (110°F) with a pinch of sugar first, then let it foam for 5–10 minutes. I learned this the hard way when my dough took forever to rise because the yeast was still asleep in the flour.
- Toast the Walnuts: Dry-toast the walnuts in a skillet over medium heat for 3–4 minutes until fragrant. This cuts bitterness and makes them taste richer—no need to chop them first, just pulse in a food processor after cooling. (Yes, even if you’re impatient like me, wait for the aroma.)
- Don’t Overmix the Dough: Once you add the flour, stop mixing after 3–4 minutes—just until the dough comes together. Overworking it develops gluten too much, and your bread will turn out dense instead of tender. My grandmother swore by this, and she was right: less effort, better texture.
- Use Room-Temp Butter: Softened butter (not melted) mixes better into the dough and creates a lighter crumb. If your kitchen’s cold, let the butter sit out for 20–30 minutes before kneading. Sounds weird, but it works—your bread will thank you.
Troubleshooting perfect results
Dense Dough Issues
If your dough feels too sticky or dense after kneading, you may have overworked the gluten or used too much liquid. Try reducing the warm water by 1-2 tablespoons next time, or add 1-2 tablespoons more flour if the dough feels too wet.
Remember, the dough should be soft but not gluey—it should pull away from the bowl cleanly. Over-kneading is common, so stop when the dough springs back slowly when poked. 💡
Uneven Raisin/Walnut Distribution
For even distribution of raisins and walnuts, fold them in gently after the initial kneading. If they're clumping, toss them in 1 tablespoon flour before adding to the dough.
Another trick? Use your fingers to press them lightly into the dough rather than mixing vigorously. This prevents sinking and ensures every bite has that perfect crunch and sweetness.
Pale or Soft Crust
A pale crust usually means the bread didn't bake long enough or the oven wasn't hot enough. Preheat your oven for at least 30 minutes before baking, and use an oven thermometer to confirm it's at 375°F.
For extra color, brush the egg wash on thicker and sprinkle coarse sugar immediately before baking. A baking stone or steel can also help create a crispier crust.
Dough Not Rising Properly
If your dough isn't rising, check three things: yeast freshness, water temperature, and proofing environment. Test your yeast by mixing 1 tsp yeast with ¼ cup warm water and 1 tsp sugar—it should bubble in 5-10 minutes.
Water should be 110°F, not hot. Place the dough in a warm spot (like a turned-off oven with a bowl of hot water inside) to encourage rising. A warm kitchen or proofing box works too.
Bread Collapsing After Baking
Collapsed bread usually means the dough wasn't proofed enough or the oven wasn't hot enough. Let the dough rise until it's at least doubled in size and springs back slowly when poked. Also, avoid opening the oven door during baking—this causes sudden temperature drops.
If your kitchen is cold, preheat the oven longer to compensate. A baking sheet on the lower rack can also help with even heat distribution.
Dry or Tough Texture
Over-kneading or using too much flour can make bread dry. If your bread turns out tough, try reducing kneading time to 8 minutes and add 1 tablespoon milk or water to the dough if it feels dry.
For extra tenderness, brush the baked loaf with melted butter while still warm. Also, ensure your flour isn't expired—old flour can absorb more moisture and lead to dryness.
Nutrition facts
Frequently asked questions
Can I make this bread without an egg wash?
Yes! For a vegan version, replace the egg wash with 2 tablespoons melted butter mixed with 1 tablespoon milk. Brush it on just before baking for a similar golden finish. The bread will still be delicious, though the crust may be slightly less crispy. For extra shine, you can also use agave syrup mixed with water in a 1:1 ratio.
How do I store leftovers to keep them fresh?
Wrap cooled slices in parchment paper and store them in an airtight container at room temperature for up to 3 days. For longer storage, freeze individual slices between parchment paper in a sealed bag for up to 3 months. To reheat, wrap slices in foil and warm in a 350°F oven for 5-7 minutes for that fresh-baked texture.
Why did my walnuts sink to the bottom?
This happens when the dough is overworked or the nuts are too heavy. To fix it, gently fold them in after the initial kneading and avoid mixing vigorously. For extra buoyancy, toss the nuts in 1 tablespoon flour before adding. Also, make sure your dough isn't too wet—adjust with 1-2 tablespoons more flour if needed.
Can I substitute walnuts with another nut?
Pecans, almonds, or hazelnuts work beautifully—just toast them first for enhanced flavor. Use the same 1.5 cups measurement and chop them similarly. For a nut-free version, try dried cranberries or chopped dates instead. The key is maintaining that texture contrast, so adjust quantities if using softer nuts like cashews.
How do I know when the dough is fully proofed?
Look for three signs: the dough should double in size, have a slightly domed top, and spring back slowly when gently poked with a finger. If it springs back quickly, it needs more time. Place the bowl in a warm spot (75-80°F) to speed up proofing if needed. A proofing box or turned-off oven with a bowl of hot water works great!