
Snacks
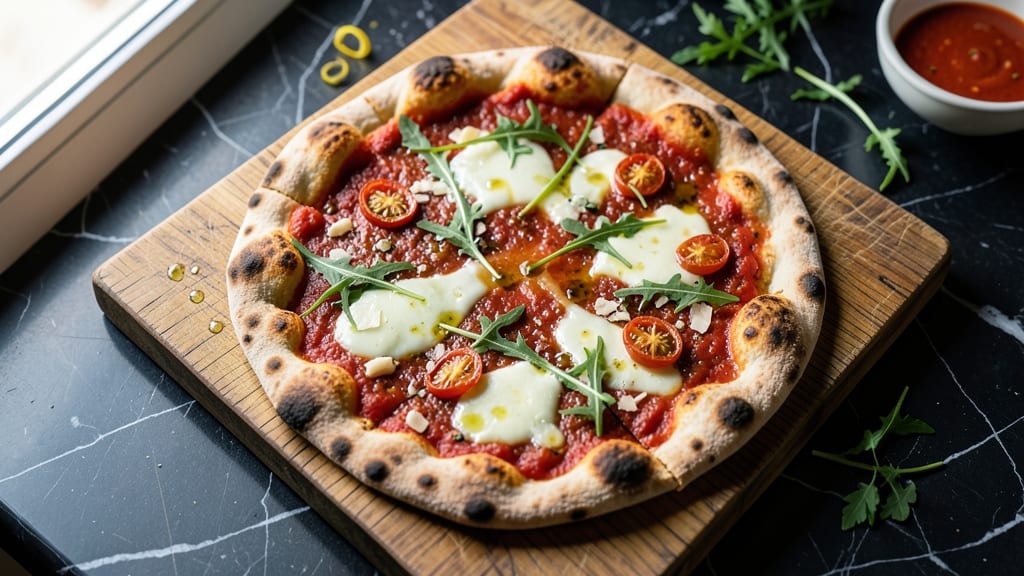
This artisan flatbread pizza recipe delivers the perfect balance of crispy blistered edges and a chewy, stretchy base that rivals any pizzeria. The secret lies in high hydration dough that develops a satisfying snap when baked, paired with a quick stretch that creates those coveted air pockets.
I've perfected this method after years of testing—no fancy equipment required, just patience and attention to detail.
The dough starts with a simple blend of bread flour, yeast, and water, but the magic happens during the fermentation. A long, slow rise at room temperature develops deep flavor and an open crumb structure, while a final proof in the fridge ensures perfect oven spring.
Toppings go on after a quick stretch, so they stay vibrant and fresh through baking.
When baked on a preheated stone or cast-iron skillet, the flatbread transforms into a golden, blistered masterpiece with crispy edges that shatter at the first bite. The interior remains tender and chewy, perfectly supporting your choice of toppings—whether classic marinara and mozzarella or gourmet combinations like prosciutto and arugula.
Every element works together for that authentic wood-fired experience at home.
This recipe builds confidence in home cooks by breaking down each step clearly, from dough preparation to baking techniques. Whether you're hosting a dinner party or craving a quick weeknight meal, the results are consistently impressive.
Let's create a pizza that tastes like it came from a Neapolitan bakery, not just your kitchen.
Ingredients for artisan flatbread pizza
High-protein flour and active yeast create the perfect stretchy, crispy base for this artisan pizza.
| Ingredient | Amount | Notes |
|---|---|---|
| Bread Flour 🌾 | 3 cups | High-protein for chewy texture |
| Active Dry Yeast 🍞 | ¼ tsp | Instant yeast preferred |
| Granulated Sugar 🍚 | ¼ tsp | Feeds yeast activation |
| Large Eggs 🥚 | 1 whole | Room temperature preferred |
| Extra-Virgin Olive Oil 🫒 | ½ cup | High-quality, fruity variety |
| Warm Water 💧 | 1 ¼ cups | 105°F for optimal yeast |
| Sea Salt 🧂 | 1 ½ tsp | Diamond Crystal preferred |
| San Marzano Crushed Tomatoes 🍅 | ½ cup | Canned, no salt added |
| Fresh Mozzarella Cheese 🧀 | 8 oz | Low-moisture if unavailable |
| Fresh Basil Leaves 🌿 | ¼ cup | Chopped for garnish |
| Garlic Cloves 🧄 | 2 cloves | Minced for sauce base |
| Dried Oregano 🍃 | 1 tsp | Italian variety preferred |
| Ground Black Pepper 🌶️ | ½ tsp | Freshly ground preferred |
| Cornmeal 🌽 | ¼ cup | For dusting pizza peel |
| Semolina Flour 🌾 | ¼ cup | Optional for dusting |
The bread flour is non-negotiable here—King Arthur or Caputo deliver the best gluten structure for that signature chewy bite. Active dry yeast should be fresh; if your jar feels stale, Bob's Red Mill sells it in small, airtight packages that last months. For the olive oil, California avocado oil has a higher smoke point than extra-virgin, making it ideal for baking. The San Marzano tomatoes are worth the splurge—their natural sweetness and low acidity shine in the sauce. If you can't find them, Whole Foods often carries a good alternative in their canned tomato section.
No fresh mozzarella? Low-moisture shredded from a block works in a pinch, but it won't melt as beautifully. The basil can be swapped for dried at one-third the amount, though fresh is ideal for that bright, aromatic finish. If you're avoiding gluten, Bob's Red Mill 1:1 baking flour replaces the bread flour, though texture will differ slightly. For a meat topping, Italian sausage or pepperoni pairs perfectly, but pre-cook to avoid soggy crusts. The garlic can be roasted for a sweeter flavor—simply toss minced cloves with olive oil and bake at 400°F for 10 minutes before adding to the sauce.
The dough keeps for 3 days in the fridge, wrapped tightly in plastic. For longer storage, shape and freeze the dough balls—thaw at room temperature before shaping. The sauce can be prepped 2 days ahead and stored in an airtight container. When baking, preheat your oven to 500°F with a pizza stone or steel inside—this ensures those coveted crispy edges. If you don't have a stone, a cast-iron skillet works beautifully for that wood-fired effect at home.
Why You'll Love This Recipe
- No-Knead Magic: I swear by this dough—just mix, let it rise, and forget it. That bread flour and olive oil combo gives it a chewy, airy texture without me having to punch or fold it into submission.
- Crispy-Creamy Crust: The secret’s in the egg wash and high-heat bake—golden edges that shatter like glass, but a pillowy center that holds sauce like a dream. (Yes, even on a Tuesday night.)
- Your Pizza Pal: Want a quick lunch? A last-minute dinner? A crowd-pleaser for game day? This flatbread takes five minutes to shape, so I load it up with whatever’s in my fridge—marinara, leftover roasted veggies, or just cheese.
- Budget-Friendly Flex: A single batch feeds four, and the ingredients won’t break the bank. That yeast and sugar combo makes the dough rise fast, so I’m not waiting around—just baking, eating, and saving money. (My wallet thanks me.)
Step-by-step instructions for artisan flatbread pizza
Master the technique for that perfect balance of crispy blistered edges and chewy, stretchy dough.
Activate the Yeast and Prepare the Dough
In a large mixing bowl, combine the 1.25 cups warm water (tested at 105°F—too hot kills yeast, too cold prevents activation) with the 0.25 tsp granulated sugar and 0.25 tsp active dry yeast. Let sit for 5-10 minutes until the mixture becomes frothy and bubbly—this confirms your yeast is alive and ready to work. If no bubbles form, your yeast is inactive and the dough won't rise properly.
Add the 3 cups bread flour and 1.5 tsp sea salt to the bowl. Using a wooden spoon or dough whisk, stir vigorously until a shaggy dough forms around the edges. This initial mixing incorporates the flour into the liquid, creating a rough but cohesive mass. The high-protein bread flour is essential here—it develops gluten strands that give your pizza that signature chewy texture and stretch.
Knead and Develop Gluten for Optimal Texture
Transfer the dough to a lightly floured surface and knead for 8-10 minutes by hand, or use a stand mixer with a dough hook attachment on medium speed for 5-6 minutes. Kneading develops gluten, which is what gives your flatbread that perfect chew. You'll know it's ready when the dough becomes smooth, elastic, and springs back slowly when poked with your finger. If it feels too sticky, add flour 1 tablespoon at a time—but don't overdo it, as excess flour can make the dough tough.
Shape the dough into a round loaf, place it back in the bowl, and cover with a damp towel or plastic wrap. Let it rise in a warm place for 1-2 hours, or until it has doubled in size. The dough should feel light and airy when pressed gently with your finger. This resting period allows the gluten to relax slightly and the yeast to ferment, creating those tiny air pockets that contribute to the chewy texture. I like to place the bowl near a slightly warm oven with the light on for consistent, gentle heat.
Prepare the Sauce and Toppings While Dough Rests
In a small saucepan, combine the 0.5 cup San Marzano crushed tomatoes, 2 cloves minced garlic, 1 tsp dried oregano, and 0.5 tsp ground black pepper. Simmer over medium-low heat for 10-12 minutes until the sauce thickens slightly and the flavors meld. The acidity in the tomatoes will help balance the richness of the cheese, while the garlic and oregano add depth. Taste and adjust seasoning—this is your flavor foundation, so don't skip this step.
While the sauce simmers, finely chop the 0.25 cup fresh basil leaves and set aside for garnish. Tear the 8 oz fresh mozzarella cheese into small, irregular pieces—this creates pockets of melted cheese throughout the pizza rather than a uniform layer. The irregular shape also helps create that classic "cheesy pull" when you take your first bite. Keep both toppings at room temperature for even cooking.
Shape and Pre-Bake the Flatbread
Preheat your oven to 475°F with a pizza stone or baking sheet inside—this ensures even heat distribution and that perfect crisp. On a lightly floured surface, gently press and stretch the risen dough into a 12-inch round, about ¼-inch thick. The edges should be slightly thinner than the center to create that signature crispy blistered edge. If the dough resists, let it rest for 5 minutes—overworking it will make it tough.
Transfer the shaped dough to a piece of parchment paper dusted with 0.25 cup cornmeal (or 0.25 cup semolina flour for extra crispiness). The cornmeal creates a barrier that prevents sticking and adds a subtle crunch. Slide the parchment onto the preheated stone or baking sheet. Spread the tomato sauce evenly over the dough, leaving a ½-inch border for the crispy edge. Scatter the torn mozzarella pieces evenly over the sauce, pressing down gently to help them adhere.
Bake to Crispy Perfection and Finish
Bake the pizza for 12-15 minutes until the crust is deep golden brown with blistered edges and the cheese is fully melted and bubbly. The center should still have a slight give when pressed—this ensures the dough remains chewy, not rubbery. If the edges brown too quickly, tent the pizza loosely with aluminum foil to prevent burning while the center finishes cooking.
Remove the pizza from the oven and immediately sprinkle with the chopped fresh basil leaves. The basil adds a bright, fresh contrast to the rich tomato and cheese. Let the pizza rest for 2-3 minutes before slicing—this allows the cheese to set slightly and makes it easier to cut clean slices. Serve immediately while the crust is still crisp and the cheese is gooey. The contrast between the crispy, blistered edges and the chewy, stretchy center is what makes this pizza truly artisan-worthy.
Pro Tips For Making Artisan Flatbread Pizza
- STRETCH AND FOLD: Use your knuckles to press dough into a ¼-inch-thick circle—then fold it in half like a taco, unfold, and rotate 45 degrees. This creates tension in the gluten without tearing, and the final crust will have those coveted "windows" without you needing a pizza wheel. (Yes, it looks like you’re making a burrito, but trust me.)
- SALT THE YEAST WATER: Dissolve the yeast in warm water with the sugar and a pinch of salt—this kills off wild bacteria that can sour your dough later. I learned this the hard way after a batch of dough took 12 hours to rise instead of 2. The salt also helps activate the yeast faster, so you’re not staring at a bowl of nothing for 30 minutes.
- DON’T OVERPROOF THE DOUGH: Your dough is ready when it springs back slowly when poked—like a sad, slow-motion jelly. If it springs back fast, it’s not done. If it doesn’t spring back at all, you’ve waited too long. I used to eyeball it and end up with either a dense brick or a sad, flat pancake. Use a timer: most flatbread doughs hit peak in 1.5–2 hours at room temp.
- BRUSH WITH OIL TWICE: After preheating your skillet or stone, brush the dough with olive oil once before cooking. Then, right before adding toppings, brush it again—this seals the crust and prevents a soggy bottom. I was skeptical until I tried it; now I double-brush even for plain flatbreads. (Bonus: use the leftover oil to grease your hands when stretching—no sticking.)
Perfect pairings for this recipe
Classic Italian Pairings
Start with a simple arugula salad tossed with 2 tbsp extra-virgin olive oil, 1 tbsp lemon juice, and a pinch of flaky sea salt. The peppery greens cut through the richness of the pizza while keeping the meal light.
For a heartier option, serve with garlic bread—toast a baguette brushed with olive oil and garlic until golden and crisp. 🥗
Pair your pizza with a bold Italian red wine like Chianti Classico or Montepulciano d'Abruzzo. Their bright acidity and cherry notes complement the tomato sauce and mozzarella beautifully. For a lighter option, a crisp Pinot Grigio from Friuli-Venezia Giulia balances the dish without overpowering it.
Craft Beer Contrasts
A hazy IPA with citrusy hops—like Allagash White—adds a refreshing contrast to the pizza’s richness. The effervescence cleanses your palate between bites, while the tropical fruit flavors echo the basil garnish.
For a malty option, try a Belgian Dubbel like Westmalle Tripel, which pairs surprisingly well with the caramelized crust.
Seasonal Vegetable Sides
In summer, roast zucchini and cherry tomatoes with olive oil, fresh thyme, and crushed red pepper until tender. Their sweetness enhances the pizza’s flavors without competing. For fall, sauté shredded Brussels sprouts with balsamic glaze and pecans for a sweet-savory contrast that stands up to the cheesy crust.
Dessert Pairings
Finish the meal with affogato—vanilla gelato drowned in a shot of espresso—to balance the richness of the pizza. For a lighter option, serve biscotti with a cup of cinnamon-spiced chai tea. The crunchy texture and warm spices provide a satisfying close to the meal. ✨
Make-Ahead Toppings
Prep toppings ahead to streamline assembly. Roast red onions and bell peppers with olive oil and smoked paprika for a smoky, caramelized topping. Store in an airtight container in the fridge for up to 3 days.
For a quick protein boost, cook Italian sausage and crumble it into the sauce before baking—just be sure to drain excess fat to avoid a soggy crust.
Nutrition facts
Frequently asked questions
Can I make this flatbread pizza without a pizza stone?
A pizza stone isn't essential! Use a cast-iron skillet or heavy baking sheet for excellent heat retention. For extra crispiness, preheat your skillet in the oven for 30 minutes before baking. If using a baking sheet, place it directly on the oven rack for better airflow to the crust's bottom.
Why does my dough keep sticking to the surface?
This usually happens when the dough is too wet or the work surface isn't properly floured. Try dusting with semolina flour instead of all-purpose—it adds texture and prevents sticking better. Also ensure your dough has rested 20 minutes after kneading to relax the gluten before shaping.
How do I prevent a soggy crust from wet toppings?
Pre-cook any wet toppings like tomatoes or mushrooms to remove excess moisture. For fresh toppings, use low-moisture cheese and add them after the pizza has baked for 2-3 minutes. Another trick is to bake the pizza uncovered for the first 5 minutes to crisp the crust before adding toppings.
Can I make this recipe gluten-free?
Yes, but texture will differ slightly. Replace bread flour with a 1:1 gluten-free baking flour blend (like Bob's Red Mill) and add ½ tsp xanthan gum to improve elasticity. Expect a denser crust—balance this by using extra cheese or a thin tomato sauce layer to compensate.
What's the secret to getting those perfect blistered edges?
The key is high heat and proper dough hydration. Bake at 500°F with your pizza stone or skillet preheated for 1 hour. Use high-hydration dough (this recipe's ratio) and stretch it slightly thinner at the edges. A quick spray of water before baking creates steam that helps those beautiful blisters form!