
Side Dishes
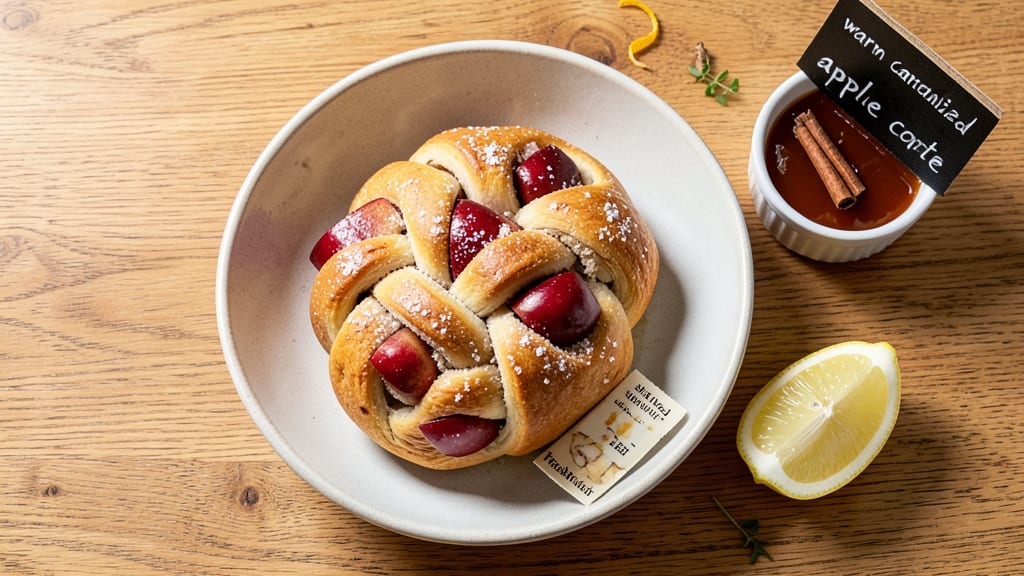
This apple braided bread recipe transforms simple dough and spiced apples into a showstopping centerpiece that smells like autumn in every bite. The secret lies in a perfectly balanced dough—light enough to braid without tearing—and a cinnamon-sugar apple filling that caramelizes into sweet, sticky strands during baking.
I developed this version after years of trial and error, ensuring the crust stays crispy while the interior remains tender, with just the right amount of apple flavor in every pull-apart bite.
The braiding technique might look intimidating, but it’s simpler than it appears once you master the basic fold-and-tuck method. We’ll use a classic yeast dough for that traditional bakery feel, but I’ll share a quick bread variation in the tips section for those short on time.
The apple filling—just diced apples, brown sugar, cinnamon, and a touch of lemon—cooks down into a fragrant, slightly sticky mixture that clings beautifully to the bread’s swirls. This isn’t just a side dish; it’s a foolproof way to elevate any meal, from holiday tables to casual Sunday brunches.
What you’ll end up with is a golden-brown loaf with a crispy crown and delicate, buttery layers of apple filling peeking through the braids. The aroma alone—warm cinnamon, caramelized apples, and yeasty bread—will have everyone gathering around the table.
The best part? This recipe scales perfectly, whether you’re feeding a family of four or a crowd of holiday guests. Let’s get started on creating your own edible masterpiece.
For those who love customization, we’ll explore variations like adding chopped pecans to the filling or brushing the finished loaf with a honey glaze. But first, let’s focus on nailing the fundamentals: the dough, the filling, and the braiding technique that makes this bread truly magical.
Trust me, once you try this, apple braided bread will become a regular in your rotation—no matter the season.
Ingredients for apple braided bread
Pantry staples plus apples and cinnamon—simple ingredients for a showstopping centerpiece.
| Ingredient | Amount | Notes |
|---|---|---|
| All-Purpose Flour 🌾 | 4 cups | Plus 2 tbsp for dusting |
| Granulated Sugar 🍚 | ¼ cup | For dough sweetness |
| Active Dry Yeast 🍞 | 2 ¼ tsp | Or 1 packet instant yeast |
| Unsalted Butter 🧈 | ½ cup | Cold, cubed for dough |
| Warm Milk 🥛 | ¾ cup | 110°F for yeast activation |
| Large Egg 🥚 | 1 whole | Room temperature |
| Salt 🧂 | 1 tsp | Kosher or sea salt |
| Brown Sugar 🍚 | ½ cup | Packed for filling |
| Ground Cinnamon 🌿 | 2 tsp | Plus extra for dusting |
| Fresh Apples 🍎 | 2 medium | Honeycrisp or Granny Smith |
| Lemon Juice 🍋 | 1 tbsp | Freshly squeezed |
| Granulated Sugar 🍚 | ¼ cup | For apple filling |
| Butter 🧈 | 2 tbsp | Melted for brushing |
The apples make or break this. Honeycrisp or Granny Smith are my go-tos—they hold their shape while baking and caramelize beautifully. Walmart or Trader Joe's usually have them at great prices, but check the farmers market for peak-season deals. Peel and dice them into 1/4-inch cubes—smaller pieces cook faster and blend better into the dough. If you can't find fresh, frozen unsweetened apples work too, just thaw and drain them first. The cinnamon? Penzeys or local spice shops carry the best quality, but the regular grocery store stuff is fine for this recipe.
No yeast on hand? Instant yeast is a 1:1 swap—just make sure it's fresh. Short on butter? Vegetable shortening or coconut oil works in a pinch, though butter gives that signature flavor. For the apples, if you accidentally dice them too small, add 1 tbsp breadcrumbs to the filling to help absorb moisture. The dough needs to be slightly sticky but manageable—if it's too dry, add 1 tsp milk; if too wet, add 1 tbsp flour. And trust me on the room-temperature egg—it mixes in much easier than cold.
Dough keeps 2 days in the fridge or 3 months frozen. The filling can be prepped ahead and stored 3 days in the fridge. For make-ahead braiding, shape the loaf and refrigerate 1 hour before baking—it makes the braiding much easier. The finished loaf reheats beautifully in a 200°F oven for 10 minutes to restore crispiness. I always slice mine with a serrated knife and serve with whipped cream or vanilla ice cream for maximum indulgence.
Why You'll Love This Recipe
- No-Knead Magic: I swear by this dough—just mix, let it rise, then braid. No stand mixer, no fuss, just 10 minutes of hands-on time while the yeast does the work.
- Sweet & Spiced Comfort: That caramelized apple filling (cinnamon + sugar, duh) turns every slice into a hug. The buttery crust? Pure satisfaction with every bite.
- Breakfast or Snack Star: Toast it for breakfast, pack it for lunch—this bread handles it all. Honestly, I’ve even used leftover slices for French toast. (Yes, even on a Tuesday night.)
- Budget-Friendly Stretch: Flour, sugar, and butter are pantry staples, and one loaf feeds my family for days. Freeze the extras? Always a win when money’s tight.
Step-by-step instructions for apple braided bread
Here's how to create a golden, crispy crown with sweet apple swirls inside.
Activate the Yeast and Mix the Dough
In a small bowl, combine the 0.75 cup warm milk (about 110°F) with the 2.25 teaspoons active dry yeast and 0.25 cup granulated sugar. Let it sit for 5-10 minutes until foamy and bubbly—this tells you the yeast is alive and ready to work. If it doesn't bubble, your yeast might be dead, and you'll need to start over.
In a large bowl, whisk together the 4 cups all-purpose flour, 1 teaspoon salt, and 2 teaspoons ground cinnamon. Make a well in the center and pour in the yeast mixture, 1 whole large egg, and 0.5 cup cold cubed unsalted butter. Mix with a wooden spoon until a shaggy dough forms, then turn it out onto a lightly floured surface and knead for 8-10 minutes until smooth and elastic. The dough should spring back slowly when poked.
Prepare the Apple Filling and First Rise
While the dough rises, prepare the filling. Peel, core, and finely dice the 2 medium fresh apples, then toss them with 0.25 cup granulated sugar, 1 tablespoon lemon juice, and 1 teaspoon ground cinnamon. Let this mixture sit while you work—this balances the sweetness and keeps the apples from browning.
Shape the dough into a rectangle about 12x8 inches on a floured surface. Roll out the apple mixture into a thin layer and spread it evenly over the dough, leaving a ½-inch border around the edges. Roll the dough tightly into a log, tucking in the sides as you go. Pinch the seam to seal, then shape into a 12-inch braid by dividing the log into three equal sections and braiding them together. Place the braid seam-side down on a parchment-lined baking sheet.
Cover the braid loosely with a clean kitchen towel and let it rise in a warm place for 1-1.5 hours, or until nearly doubled in size. The dough should feel light and airy when pressed gently—this is your cue that it's ready for the oven.
Shape the Crown and Second Rise
Preheat your oven to 375°F. Lightly brush the risen braid with 2 tablespoons melted butter and sprinkle generously with 2 tablespoons granulated sugar and an extra pinch of ground cinnamon. Gently shape the braid into a round loaf, tucking the ends under to form a crown. Place it on a baking sheet and let it rise for another 20-30 minutes—this final rise ensures a light, airy texture inside.
Here's the thing—don't skip this step. The crown shape is what gives this bread its iconic look, and the second rise makes all the difference. The dough should puff up noticeably and feel springy to the touch. If it doesn't rise much, your kitchen might be too cold—try placing the pan on top of the oven for 5 minutes to warm it up.
Bake to Golden Perfection
Bake the bread for 30-35 minutes until the crown is deep golden brown and the internal temperature reaches 190°F. The edges should be crispy, and the top should have a glossy sheen from the melted butter. If the crown browns too quickly, tent the bread with foil to prevent over-browning while it finishes baking.
For that perfect crispy texture, I like to bake it on the middle rack—this ensures even heat distribution. You'll know it's done when the loaf pulls away from the sides of the pan easily and sounds hollow when tapped on the bottom. Let it cool on a wire rack for at least 20 minutes before slicing—this prevents the filling from oozing out and keeps the bread from falling apart.
Serve Warm with Extra Butter
Slice the bread while it's still warm for the best texture—each slice should reveal those beautiful apple swirls inside. Serve it with a pat of softened butter on top or a dusting of powdered sugar for extra sweetness. The crust should be crispy and golden, while the interior remains soft and tender with pockets of spiced apple filling.
This is the moment that matters: the first bite should deliver a perfect balance of crispy crust, warm dough, and sweet apple filling. If the bread cools completely, you can reheat slices in a 350°F oven for 5-10 minutes to restore that fresh-baked magic.
Pro Tips For Making Apple Braided Bread
- Test Yeast First: Skip straight to mixing and you might end up with a sad, flat loaf. Sprinkle that active dry yeast into warm milk (110°F) with a pinch of sugar first—if it bubbles within 5 minutes, you’re good to go. No bubbles? Toss it and start fresh. (Yes, it’s annoying, but your bread will thank you.)
- Soften Butter Properly: Cold butter makes the dough tough and chewy. Rub it between your fingers until it’s soft but not melted—think "squishy peanut butter" consistency. This ensures even distribution in the dough without turning it greasy. (I used to eyeball it and regretted it every time.)
- Braid Tight, Not Loose: A loose braid unravels like a drunk spider’s web. Pull each strand taut before weaving, and overlap the edges by about ½ inch. The tension keeps the shape intact while baking. (Trust me, your bread will look like a professional’s if you do this.)
- Brush Sugar Early: Don’t wait until the bread’s golden to glaze it with sugar—do it right after baking while the loaf is still hot. The sugar melts instantly, caramelizing for that glossy finish. (I learned this after slathering sugar on a cooled loaf and getting a sticky mess.)
Health benefits of this recipe
Whole Grain Boost
Swap up to 2 cups of the all-purpose flour for whole wheat or spelt flour to add fiber and nutrients. I like King Arthur Whole Wheat Flour because it blends seamlessly without altering the texture much.
This boosts your daily fiber intake by about 8 grams per serving—perfect for keeping digestion smooth while enjoying something sweet. 🌾
Natural Sweetness
The apples and brown sugar provide natural sweetness without refined sugar overload. One serving contains about 12 grams of sugar, mostly from the fruit itself, making it a more balanced treat than many store-bought pastries.
The cinnamon also helps regulate blood sugar by improving insulin sensitivity—great for a satisfying dessert without the crash. 🍎
Protein Power
While not a protein-heavy dish, the egg and milk in the dough contribute about 6 grams of protein per serving. For a boost, add 2 tbsp chopped walnuts to the filling—they add healthy fats and an extra 2 grams of protein.
This makes the bread more satisfying if you're looking for a slightly heartier option. 💪
Antioxidant Rich
The cinnamon and apples are packed with antioxidants like quercetin and polyphenols. Cinnamon helps reduce inflammation, while apples provide vitamin C and fiber. Together, they make this bread a surprisingly nutritious treat—especially when compared to processed sweets with empty calories. 🌿
Comfort Food Energy
The combination of complex carbs from the flour, natural sugars from the apples, and fats from the butter provides sustained energy. This makes it a great option for post-workout recovery or a cozy afternoon pick-me-up.
The warmth of the spices also triggers serotonin release, which is why this bread feels so comforting. ✨
Gluten-Free Option
For gluten-free versions, use a 1:1 gluten-free flour blend like Bob's Red Mill or King Arthur. You may need to add 1 tsp xanthan gum to mimic the dough's elasticity. While the texture will differ slightly, you'll still get the sweet apple flavor and crispy crust—just without the gluten. 💛
Nutrition facts
Frequently asked questions
Can I make this bread without yeast?
Yes! For a quick version, replace the yeast dough with a simple muffin-style batter made from 2 cups flour, 1/2 cup milk, 1 egg, 1/4 cup melted butter, and 1 tsp baking powder. Mix in the apple filling, shape into a braid, and bake at 375°F for 25-30 minutes. The texture will be denser but still delicious.
How do I prevent the braid from falling apart?
Chill the shaped braid in the fridge for 30 minutes before baking to firm up the dough. Use a sharp serrated knife for slicing, and avoid cutting through the braids—slice between them instead. Also, don't overfill with apples, or the weight can pull the braid apart during baking.
What apples work best for this recipe?
Honeycrisp, Granny Smith, or Fuji apples are ideal—they hold their shape while baking and caramelize beautifully. Avoid soft varieties like McIntosh, as they'll turn mushy. If using Granny Smith, add 1 tbsp lemon juice to prevent bitterness. For extra flavor, toss in 1/4 tsp nutmeg with the cinnamon.
Can I make this ahead of time?
Shape the braid and refrigerate it overnight. The next day, let it rise for 1 hour at room temperature before baking. For long-term storage, freeze the unbaked braid (wrapped tightly) for up to 3 months. Thaw overnight in the fridge before baking. The flavor actually improves after a day or two!
Why did my bread turn out dense?
Dense bread usually means the yeast didn't activate properly or the dough didn't rise enough. Double-check your yeast by testing it in warm water with sugar—it should foam in 5 minutes. Also, ensure your kitchen is warm enough (above 75°F) and the dough rises in a draft-free spot. If the dough was overworked, knead it gently next time.